Showing posts with label Feed. Show all posts

Wednesday, May 06, 2009

How to create Blog Archive Widget Without Date / Month / Year using Feedburner?


If you like to create custom widget for the blogger which shows list of post titles only without date / month / year then you can do this using feed burner.

  • Create customized feed using feedburner (Note: if you wish all your post listed in the feed then while creating the feed burner feed give your feed URL as http://BLOGNAME.blogspot.com/feeds/posts/summary?start-index=1&max-results=SOME_BIG_Numebr_Greater_than_no_of_post_in_your_blog . For example for my blog I should use http://technical-tejash.blogspot.com/feeds/posts/summary?start-index=1&max-results=300 )
  • If there is an error stating "Your feed filesize is larger than 512K. You need to reduce its size in order for FeedBurner to process it. Tips for controlling feed file size with Blogger can be found in Tech Tips on FeedBurner Forums, our support site." while creating feed then you are not able to show all your posts on your blog, so in this case use smaller number for the value of max_results while creating custom feed. (For example in my case I have more than 250 posts but I have used http://technical-tejash.blogspot.com/feeds/posts/summary?start-index=1&max-results=200)
  • Now create feed redirection on blogger blog
  • After go to Publicize section for your feed on feed burner
  • In this section select Buzz Bosst
  • If it is not activated the scroll down to the end and click on Activate button to activate this


  • After activating this scroll down to the end and here select following options
  • Number of items to display = All
  • Select check box for Display feed title (if you wish to display tittle of your blog)
  • Select check box for if you wish to display favicon
  • Similarly you can select or deselect check boxes as per your need as shown in the given image
  • After making desires changes click on Save button to save the changes
  • Once it is saved you can scroll up for getting the code for the widget.
  • There are 2 methods to get the code and create the widget / gadget on the blogger
  • One is select Blogger option in the dr0pdown for Use as widget and click on Go button
  • This will redirect you to blogger and ask you for login to blogger.com if you are not already logged in.
  • If you are logged in to blogger.com it will show you drop down for selecting the you blog where you place this widget select appropriate blog and save this and every thing is done
  • Second method is copy the script code as shown in the above image and Add HTML/JavaScript gadget / widget (at Layout -> Add Elements section of your blog)to blogger and paste this code in the content section of the widget
  • Save you blog template and every thing is done

Related Articles

How to have Add a Gadget option for Blog Post section of the blogger’s blog and how to make Blog Post gadget / widget moveable?

How to have Add a Gadget option for Header section of the blogger’s blog and how to make Header gadget / widget moveable?

How to add / Change Header image of blogger’s blog?

How should I restore my blog’s logo after changing to custom template?

How should I change my blog’s logo?

Change the order of the blog post archive

How to enable / disable adsense ads for the blog post widget ?

My blog is lost or forgot username / password of blogger blog

How to change scroll bar color and look and feel for a blog or website / web page?

Blogger Link list with the scroll bar support - link list with large set of links

How to change value of Older Post / Newer Post / Home for the blogger's blog

Enable / Disable receiving comments alert on email for blogger blog

How to make comments for blogger's blog moderated and How to moderate comments ?

Embed adsense ads withing post

Share |
Showing posts with label Feed. Show all posts

Tuesday, March 17, 2009

Email Subscription For TypePad / TypePad (Japan) Blog using Feed Burner


On my blog you can see Email Subscription option for visitors. This is very useful for visitors who is willing to receive updates of my blog via email (This email address can be any email address not just Gmail)

To configure email subscription first make sure following things:

  1. You must have feedburner.com account if not click here
  2. You must have customized your blog's feed using feedburner feed if not click here
After all these you can follow bellow steps to add email subscription option to blogger's blog.
  1. Log in to feedburner.com and from home page click on the feed name you wanted to customize.
  2. Click on "Publicize" tab
  3. Click on "Email Subscriptions" link and if you have not yet activated email subscription feature than click on "Activate" button
  4. After activation is done you can see the screen as bellow
  5. In this screen select "TypePad" or "TypePad (Japan)" option in the drop down for "Use as a widget in" and click on "Go!" button
  6. This will redirect ti TypePad Login page. Login using your TypePad account and follow the steps.
Related Articles:
  1. How to create Feed Burner account ?
  2. How to customize blogger's or TypePad's feed using feed burner ?
  3. How to redirect your Blogger feed to your FeedBurner feed ?
  4. How to provide email subscription option for Blogger or blogspot blog using Feed Burner ?

Share |
Showing posts with label Feed. Show all posts

Email Subscription For Blogger / Blogspot Blog using Feed Burner


On my blog you can see Email Subscription option for visitors. This is very useful for visitors who is willing to receive updates of my blog via email (This email address can be any email address not just Gmail)

To configure email subscription first make sure following things:

  1. You must have feedburner.com account if not click here
  2. You must have customized your blog's feed using feedburner feed if not click here
  3. You must have redirected blogger's feed URL to newly customized feed URL of the feed burner
After all these you can follow bellow steps to add email subscription option to blogger's blog.
  1. Log in to feedburner.com and from home page click on the feed name you wanted to customize.
  2. Click on "Publicize" tab
  3. Click on "Email Subscriptions" link and if you have not yet activated email subscription feature than click on "Activate" button
  4. After activation is done you can see the screen as bellow
  5. In this screen select "Blogger" in the drop down for "Use as a widget in" and click on "Go!" button
  6. It will redirect to blogger's "Add Page Element" Page
  7. On this page select the blog where you wanted to add email subscription option at "Select a blog" drop down list
  8. You can also specify the "Title" for this Gadget / Widget
  9. If you know HTML and you want to customize how the Email Subscription Gadget /Widget should look at you blog using HTML code than click on "Edit Content" link and and modify the HTML code as per you requirements, if you do not know HTML then must skip this step
  10. After this click on "Add Widget" button and Email Subscription Gadget / Widget gets added to your specified blog and you can see Layout of your blog as bellow
  11. You can drag your email subscription Gadget / Widget to any where you wanted to place on your blog using mouse.
  12. Finally you can click on "Save" button and every thing is done
  13. Now if you open your blog you can find email subscription Gadget / Widget on your blog.
Related Articles:
  1. How to create Feed Burner account ?
  2. How to customize blogger's feed using feed burner ?
  3. How to redirect your Blogger feed to your FeedBurner feed ?
  4. Email Subscription For Typad Blog using Feed Burner

Share |
Showing posts with label Feed. Show all posts

How do I create customized feed a Blogger / Blogspot / TypePad blog using Feed Burner ?


Feedburner.com gives you option to customize the feed for your blog, and you can give visitors to subscribe via email and also track visitors and how many people had subscribed to your feed. It also give lot of customization options. Here I will explain how you can use feedburner for providing email subscription option to your blog.

If you do not have feed burner account then, please follow the steps to create the feedburner account.

Now follow these steps to create customized feed for blogger blog

  1. Login to feedburner.com and you will go to home page.
  2. Here type your default feed URL in the text box as shown bellow (Note: if you have blogger blog then your feed URL will be like http:///feeds/posts/default for example for my blog URL is http://technical-tejash.blogspot.com/ so my feed address is http://technical-tejash.blogspot.com/feeds/posts/default for TypePad blog you can specify the default feed for the TypePad blog)
  3. Select a check box I am a podcaster! and click on Next button.
  4. It will open bellow screen, here you can edit the Feed Title and new Feed Address
  5. The Create or Sign In To Your FeedBurner Account page should appear.

  6. Also on this page, create a FeedBurner account by picking a username and password and supplying your email address.

    When you've supplied all the required information on this page, click Activate Feed ». A "Congrats" page should appear.

  7. Read all of the information on "Congrats", then click Next » to continue with the setup process.

  8. If you selected "I am a podcaster" on the homepage, configuration options for our SmartCast service will appear. Here you can supply categories and other information for iTunes, append a copyright message, and submit your podcast to Yahoo! Search.

    When you are finished, click Next ». Configuration options for FeedBurner stats services should appear.

  9. On the stats configuration page, select the level of feed stats detail you want.

    Click Next » to finish the setup process and enter our feed management interface.

    You're now ready to make your FeedBurner feed available on your Blogger site!

Related Articles:
  1. Create Feed Burner account
  2. Redirecting your Blogger feed to your FeedBurner feed
  3. Providing Email subscription option for Blogger or blogspot blog using Feed Burner
  4. Providing Email Subscription for TypePad or TypePad (Japan) Blog using Feed Burner

Share |
Showing posts with label Feed. Show all posts

Tracking 100% of your feed traffic: Redirecting your Blogger feed to your FeedBurner feed


Blogger can make sure all feed traffic for your blog content goes to your FeedBurner feed. This helps make sure your FeedBurner stats are comprehensive and accurate; even subscribers to the 'Original Feed' are routed through FeedBurner.

If you do not have feed burner account than create account using these steps

First customize you feed using feed burner: click here for more details

To redirect your feed:

  1. In a new browser window, sign in to your Blogger account.

  2. From the Blogger Dashboard, click the Settings link for the blog you want to promote.

    The Settings page for your selected blog should appear.

  3. Click the Site Feed link under the Settings tab.

  4. Type your complete FeedBurner feed address into the Post Feed Redirect URL text field.(Note: This is the URL which you have created at FeedBurner customized feed. You can find it using "Edit feed details" link for your blog.) Make sure you type in your entire feed address including the "http://" portion.

  5. Click Save Settings.

    You should see the message "Settings were Saved Successfully".

  6. Blogger will now redirect all feed traffic for your blog to your FeedBurner feed.

Related Articles:
  1. Create Feed Burner Account
  2. Customize blogger's feed using feed burner
  3. Providing Email subscription option for Blogger or blogspot blog using Feed Burner
  4. Providing Email Subscription for TypePad or TypePad (Japan) Blog using Feed Burner

Share |
Showing posts with label Feed. Show all posts

Creating Feedburner account for Feed Redirection of Blogger / Blogpot / TypePad Blog


Feedburner.com gives you option to customize the feed for your blog, and you can give visitors to subscribe via email and also track visitors and how many people had subscribed to your feed. It also give lot of customization options. Here I will explain how you can use feedburner for providing email subscription option to your blog.

Please follow the steps to create the feedburner account.

  1. Go to http://www.feedburner.com/fb/a/home Now changed to http://feedburner.google.com/fb/a/myfeeds
  2. Click on Register link at the top near right side
  3. This will open Google's login page. If you have Google id then login with that other wise click on the Create Account link bellow.
  4. Once you login with Google Account, you will be redirected to FeedBurner's home page
  5. Finally you have created Feed Burner account.
Update: If you have Google Account then you do not need to create feedburner account since Feedburner is now part of Google.  You can just go to http://feedburner.google.com/fb/a/myfeeds and login with Google Account.
    Related Articles:
    1. How to customize blogger's feed using feed burner ?
    2. How to redirect your Blogger feed to your FeedBurner feed ?
    3. How to provide email subscription option for Blogger or blogspot blog using Feed Burner ?
    4. How to provide email subscription for TypePad or TypePad (Japan) Blog using Feed Burner ?

    Share |
    Showing posts with label Feed. Show all posts
    Showing posts with label Feed. Show all posts

    Friday, January 02, 2009

    How can I reduce Blogger's feed size below FeedBurner's 512K limit?


    FeedBurner does not accept an original feed from your blog if it is greater than 512K in size. (This limitation only applies to the actual size of the feed file itself and does not include any images or media files you may have linked to or embedded in your posts.) In this case you blog has too many post while you are burning Feed burner feed

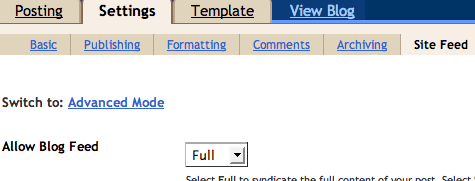
    To Reduce the feed size bellow 512K first you should make Allow Blog Feeds to short at Settings->Site Feed.

    Next, you need to add a parameter to the address for your original feed's URL — the one that FeedBurner checks for updates in order to keep your FeedBurner feed current — that tells Blogger to shorten it to a specific number of posts.

    To add this parameter while burning new feed:

    1. Sign in to your FeedBurner account.
    2. For blogger feed URL will be like as bellow:
    http://technical-tejash.blogspot.com/atom.xml
    OR
    http://technical-tejash.blogspot.com/feeds/posts/default

    But while specifying feed URL at
    Burn a feed right this instant give the feed URL like this:
    http://technical-tejash.blogspot.com/feeds/posts/default?max-results=5

    Select and click Next

    To add this parameter for existing feeds:

    1. Sign in to your FeedBurner account.
    2. Click the title of your FeedBurner feed on the My Feeds page.
    3. On the feed management page that appears, click the Edit Feed Details... link just below your feed's title.
    4. In the Original Feed Address field, change the address listed there from an example like the following:
    1. Code:
      http://technical-tejash.blogspot.com/atom.xml
      OR
      http://technical-tejash.blogspot.com/feeds/posts/default


      to the following format:

      Code:
      http://technical-tejash.blogspot.com/feeds/posts/default?max-results=5

      (Note that max-results sets the number of posts you want to have appear in your FeedBurner feed. Any integer value between 1 and 500 is permitted.)
      5.Click Save Feed Details. Your changes are immediately applied and FeedBurner re-burns the newly shortened (or lengthened) feed.

    How to tell the filesize of your feed?

    Enter its address into www.web-sniffer.net and look at the report it returns; there should be a value in kilobytes for the size of your feed in an "uncompressed" format.

    Share |

    No comments yet

    Topics

     
    Embed Wave to Blogger