Showing posts with label howto. Show all posts

Thursday, July 07, 2011

Google+ Plus FAQ (Frequently Asked Questions)


May of you may be managed to get Google+ (Plus) account or may be struggling to get one for yous. You must be having so many questions on Google Plus like  why there is age restriction of 18+ on Google+ ? or Why some one who already got invitation are unable to join Google Plus? or How can you invite your friend on Google Plus? or Do I need GMail account to access Google+?

The list of questions related to Google+ Plus may go to very large. I found few list of frequently asked question (FAQ) related to Google plus in discussion forum of Google plus and I would like share them with you. Additional to this you can also check out features of Google plus and tips & tricks for Google +


Welcome to the Google+ Unofficial Frequently Asked Questions

You can join Google+ by going to the Google+ Project site, select "Join" and a clicking on the button "Keep me posted". You can enter your e-mail address and other information and when a spot opens up you will be sent an e-mail that will allow you to join. There's also a loop hole that allows you to get an invitation. 
 
How does the loophole work? 
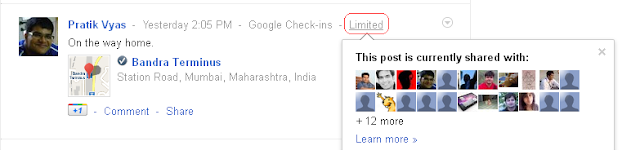
If you know someone that's already using Google+ they can add you to a circle and share a stream with you. This will send you an e-mail with info about the stream and you'll be able to click the "join Google+" button.

Why is Google+ invitation only?
This new service isn't ready for public use just yet. Google is making the service available for field testing meaning they'd like a handful of regular people to use it and give feedback so they'll know what to improve and whether there are bugs that need fixing. So once again there's no point in complaining that you can't join freely or add people instantly since that's not purpose at the moment. This is not a public release.

People sent me invites but I'm not getting the e-mails, why?
There's a delay, sometimes up to 12 hours or more, for Google+ e-mail arrivals. It's probably due to regulating people using the loophole to get in. If  you're lucky enough to get an invite, please be patient and keep on checking the Google+ front page to see when they open up to allow people in.

I received an invite but I can't join, what gives?
The amount of people allowed to join is defined by the amount of space on the servers to host these people. As Google is expanding the capacity more people are able to join. So even if you receive an invitation you are only able to join if and when a spot opens up.

How do I invite people to Google+?
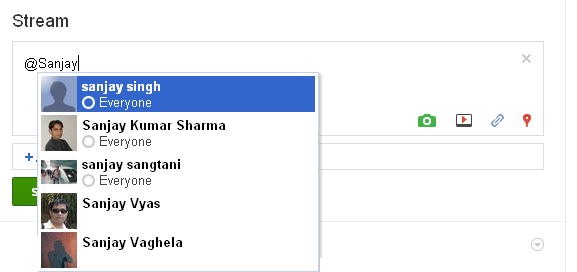
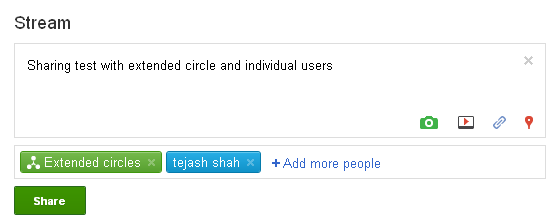
Once you've managed to join the site you can help other people join by exploiting the loophole. Simply go to "Circles" and click on the "Add a new person button". Enter their e-mail address, name and assign them a circle. Once everybody's added go to "Home" enter something you'd like to share in the stream box and add the circles that contain people that you'd like to invite. Make sure the box below the post next to Share is checked (it says: Also email X people yet not using Google+). This will prompt an email of the stream to be send to them allowing them to click the join button. Warning: this email most likely will have hours of delay.

Do I need a G-Mail account to join Google+?
You don't need a Gmail account to join the project though having a Google account in advance might help you getting started a bit quicker. You can link any email to the Google account as well.

Are the loopholes closed?
No, the reason people aren't able to join is because there needs to be a spot open for them on the server. So whether you got your invite by exploiting a loophole or you got an official invitation from Google, you are only able to join when there's room for you on the servers.

I got invited and had a spot open but I still can't join because I'm too young, why?
You need to be 18+ to join Google+. Before you make any steps to get an invitation, make sure that the email you're using has your age or birthday year set up so you'll appear as 18 or older or you will get rejected from the project. In case this happens you'll need to set up a new email as an 18+ and start all over again. (I hope Google won't stone me for this)

Why do I need to be 18+ to join?
Google are looking for serious and mature people to test their product and give proper feedback. Also 18+ people are more likely to have in depth knowledge about the workings of a social network site and other technical knowledge which will provide them with better and insightful feedback.

Will Google+ be limited to 18+ year old?
No, this is a trial period. Once the product is ready to be launched the age restriction will be set to 13+.

Conclusion:
Keep in mind that this is a trial period for an unfinished project to test the features that are available and give feedback on points of improvement and bug fixes. Don't expect for things to function perfectly and to have all the features you want already available. Please give as much feedback by using the button at Google+ often found at the bottom of the page or share your story here.

Share |
Showing posts with label howto. Show all posts

Wednesday, July 06, 2011

How To Send Google+ Plus Invite to Friend ?


By now you must have managed to get the Google+ (PLUS) account. And may be you are looking to invite your friends on Google+ (PLUS) so that you can have real-time communication using it. Currently Google+ (PLUS) is enabled to limited users only and you can invite limited friends only. But here is very simple tricks using which you can send invitation to Google+ any number of friends.

Trick 1: Invite your friend on Google plus by sharing the post with him/her
- Create a stream / post in Google+ and at the bottom there is message "Add circles or people to share with..." that place you can directly type email address of the friend whom you want to invite.
- Also you can add set of your friends in to one circle and select the circle while sharing the stream or post.

Trick 2: Create handout with your friend whom you are willing to invite to Google+
Create hangout for Google+ from "Start Hangout" button of right side navigation, and add any one email address of your friend whom you wanted to invite to Google+. That will send out an email to him / her and by clicking on the link in the email he/she will be able to join Google+.

Once you sent invite you can also ask user to visit http://plus.google.com where they can find option to create Google plus profile.

Share |
Showing posts with label howto. Show all posts

Sunday, July 03, 2011

Google Plus Features, Tips and Tricks


Recently Google has rolled out Google+ (Plus) that is a really amazing power packed social networking website and looks much more better than Facebook and Twitter.

Google+ has everything AJAX in it, simple look and feel but amazing set of features in it. One has to accept that Google has done some really good and hard work in bringing out Google+. After all, it was their long time wish to have a Google Social Network that can dominate over the web.

From my experience with Google Plus, I would like share some important features of Google+ and some handy tips and tricks about Google+. All these tips let you experience the actual power of Google+ (PLUS).

* One of the important feature in Google+ (PLUS) is Circles, which if you see initially that looks similar to lists in Facebook or Groups in Orkut. But when you really experience Google+ you will know it is much more than List or Group. You can access circles from Circles tab
* With Google+ Plus Circles you can add or remove any to circle just by drag and drop.

* We can use circles while sharing the post to share with selected users only. You can also create hangout with selected circles. Circle give more control over privacy then using individual users.

* Using Google+ you can create Hangout by clicking Start a Hangout button. Using Hangout we can create audio/video conference with any circle or individual users.

* You can click on Google+ Profile pictures to rotate through them.

* Click ‘j‘ to navigate down to the updates item or ‘k‘ to navigate up when checking the stream or any other page containing updates from friends using keyboard.

* To add formatting like bold, italics, strike-through to your text while sharing something on Google+, use the simple trick below.
  • (*)bold(*):  Add * before and after the message.
  • (_)italics(_):  Add _ before and after the message.
  • (-)strike-through(-):  Add - before and after the message.
For example: *Bold Sample* _Italics Sample_ -Strike Through Sample- will appear as shown below:

* If you find a typo in the update which you have shared, what will you do? May be delete the post and share the same post again with correct content. Fortunately Google+ supports editing posts even after you have. Use the drop-down menu of your post to edit or delete it.

* If you don't want people to leave comments or re-share your posts with others it with others? With Google+ you can turn that off there too. Click on the drop-down menu of your post there you can find the options to Disable Comments and Disable Reshare

* Click on “Limited” next to the timestamp to find out the actual list of persons with whom you are sharing a particular post.

Screenshot showing how to check with whom particular Google+ stream post is shared with.

Addressing someone from your contacts in the shared content stream
* Similar to Facebook and Twitter using # to address someone, Google+ is using + or @ symbol to address someone. Additional to that it gives auto suggestions by reading form your contacts list. Add a + or @ to mention someone specifically in a post.

* To view individual post separately, click on the Timestamp of the page. Which would take you to the permalink (web URL) of any post.

* Google+ not just supports sharing you posts with selected circles or public, but there is concept call "Extended Circles" which will share your post with everyone in your circle and additional to that, everyone in their circle (i.e. Friends and their Friends). Also we can share post with individuals by typing their names.
Sharing post with Extended Circles and individual users
* Google+ also supports editing / rotating individual photos uploaded by you. It’s easy and flawless.
Open any picture uploaded by you or visit the gallery. Select Actions > Edit photo. Additional to this you can see the details of the photo and add tags and caption to the photo.

Then improve your not so good photos by adding some smart effects to them in a click.

* Google Talk / Chat is also built withing Google+ which enables chat, video and audio call within Google+.
* You also can Resize the Chat Box in Google+. To do so, just drag the box by its corner or sides.

* If you are annoyed with some post that is getting lots of comments and thus irritating you with notifications. Just Mute the post from context menu which comes by clicking down arrow present at top right of each post on Google+ as shown in following image.
* You can even Block any person for sharing posts with you using Block this person and can Report Abuse against him as shown in above image

* You can also move to individual post page or find the link or URL of individual page by clicking on Link to this post in

* Set Options for any post made by you by clicking the grey drop-down ‘Options’ icon. You can choose to Edit it, Delete it, Disable comment or Disable Resharing a post.

* Google+ notifications & share options are at the topbar in Google+ as shown bellow and if you are logged in to Google account same will be available in GMail and any other Google Services. Using this you can access notification of Google+ from any GMail itself as shown in following UI. Also you can click on Share button at top right corner to share any thing on Google+ withing GMail or Google Search or any other Google services now that is really seamless integration.
Notifications for Google+, that's also available within any Google Services like GMAIL and Google Search
Share a post to Google+ withing GMAIL or Google search

* Tired of receiving notifications for a particular post you made or commented on? Just hit “Mute this post” to get rid of it.

* With Google+ you can preview how your profile appears to others – Input his/her username, select Edit profile, make the alterations to your profile only for that specific person. This is something unique form Google+ compare to other social networks!

* While you are on the Home tab, press twice the q key on the keyboard to search and add people to your chat list. (Press q 2nd time after a gap of sec).

* This is very important keyboard friendly shortcut similar to pressing j / k to move down / up in the posts. Hitting Enter when focused on a Post opens up the comment box in Google+.

* Set delivery preferences and tick mark desired entries under “Receive Notifications” for various actions on Google+ . Visit this link to edit the settings: https://plus.google.com/settings/plus  using this you can configure email delivery options as follows
* What’s that Incoming option under Stream of Google+? "Incoming" stream is stuff from people who are sharing with you, but who you haven’t added them to a circle.

* Give feedback – Found any bug or have a tip to suggest for Google+? Just click Send feedback from lower right corner, cool part is you can highlight the faulty area and report about it.

* Trick to Invite anyone to Google+ even if you don’t have invites –
1) Make a post in Google+, Share it
2) Create Google+ hangout with your friend
*  How to Enable Email Feature on your Google+ Profile

* You can even use the Scroll wheel of your mouse to Navigate through the Photos in the gallery withing Google+
> If you’re on Google+ then you can add me to your Circle. [My Google+ Profile]
>> Do post your comments below and share this post with your Google+ friends. :)

Share |
Showing posts with label howto. Show all posts

Thursday, December 24, 2009

HOW TO Embed Wave in to Blogger Blog? Step by Step guide / workarounds to embed wave into blogger blog


I have explained the way to embed a wave into website or blog and add multiple wave into web site or web page. But which doesn't seem to work for the blogger blog. As per this guide if we place the given code before in the HTML Template of the blog then you may get the following error as shown in the bellow image:
"Your template could not be parsed as it is not well-formed. Please make sure all XML elements are closed properly.
XML error message: The content of elements must consist of well-formed character data or markup.
"

Hence here I am going to publish some easy step by step guide for the work around which I have found.

Workaround 1: Use the script with escaped HTML characters as shown in the following steps:

  • Log in to www.blogger.com and go to Layout for the blog in which you would like to embed wave.
  • Now you are at Layout->Page Elements. Now "Edit HTML" link to go edit HTML template of your blog.
  • Here the first thing you need to do is take a back of your HTML template. Hence you can restore it later if you wanted to undo changes (Click here to know how to backup and restore HTML template for blogger’s blog)
  • Then click on Checkbox for Expand Widget Templates to view complete HTML Code of your blog.
  • Once it is done scroll down to the end of the HTML Template code. Here you can find </body> tag, just before </body> tag copy and paste following code:

    &lt;script src=&quot;http://wave-api.appspot.com/public/embed.js&quot; type=&quot;text/javascript&quot;&gt;&lt;/script&gt;
    &lt;center&gt;&lt;a href=&quot;http://technical-tejash.blogspot.com/2009/12/embed-wave-in-to-blogger-blog.html&quot;&gt;Embed Wave to Blogger&lt;/a&gt;&lt;/center&gt;
    &lt;script type=&quot;text/javascript&quot;&gt;
    /*
    Embed Google Wave Script v2.1
    Encoded with escape characters By: Tejash Shah : http://technical-tejash.blogspot.com
    Embed Google Wave Script v2.0
    Re-writen by: Jayson Ragasa, Baguio City, Phillipines
    Original Version (V1.0) from Mr Embeddy: embeddy@appspot.com
    this JS code is for Blogspot only
    */
    var div = document.getElementsByTagName(&#39;div&#39;);
    
    for (var i = 0; i &lt; div.length; i++) {
    if( div[i].id.substr(0, 5) == &#39;wave_&#39; ) {
    var id = div[i].id.substr(5, div[i].id.length-5);
    
    var wave = new WavePanel(&#39;https://wave.google.com/wave/&#39;);
    wave.setUIConfig(&#39;white&#39;, &#39;black&#39;, &#39;Arial&#39;, &#39;13px&#39;);
    wave.loadWave(&#39;googlewave.com!w+&#39; + id);
    wave.init(document.getElementById(div[i].id));
    }
    }
    &lt;/script&gt;
    
    
  • After this click on "SAVE TEMPLATE" link to save the template. This time you can be able to successfully save the template.
  • If there is any issue with the template then restore previously backed up template (follow the instruction to restore the backed up template)
  • Once everything is fine then you can add one or more waves using HTML / Javascript gadget as per following steps.
  • Go to Layout -> Page Elements and click on "Add a Gadget" link as shown in the following image.
  • In the Content section write the following code for each wave you need to embed in to your blog (Note: Here you need to replace wave Id of your wave in place of <WAVE_ID> and you can change the value of height and width as per your requirements see the examples).

    <div id="wave_<WAVE_ID>" style="width: 300px; height: 500px"></div>
    

    Examples:


    <div id="wave_ZZjLgImEV" style="width: 560px; height: 420px"></div>


    <div id="wave_ZZjLgImEV" style="width: 500px; height: 200px"></div>


    <div id="wave_ZZjLgImEV" style="width: 450px; height: 250px"></div>
    

  • Then click on "SAVE" button to save this gadget and now you can move this HTML / Javascript gadget to any where in your page elements layout and save the template.

Workaround 2:
  • Log in to www.blogger.com and go to Layout for the blog in which you would like to embed wave.
  • Now you are at Layout->Page Elements, here click on "Add a Gadget" link and from the pop up select "HTML / Javascript" gadget to add.
  • In the Content section of the Gadget copy & paste following code,

    <script src="http://wave-api.appspot.com/public/embed.js" type="text/javascript"></script>
    <center><a href="http://technical-tejash.blogspot.com">Embed Wave to Website or Web Page</a></center>
    <script type="text/javascript">
    /*  Embed Google Wave Script v2.0
    Re-writen by: Jayson Ragasa, Baguio City, Phillipines
    Original Version (V1.0) from Mr Embeddy: embeddy@appspot.com
    this JS code is for Blogspot only
    */
    var div = document.getElementsByTagName('div');
    
    for (var i = 0; i < div.length; i++) {
    if( div[i].id.substr(0, 5) == 'wave_' ) {
    var waveid = div[i].id.substr(5, div[i].id.length-5);
    
    var wave = new WavePanel('https://wave.google.com/wave/');
    wave.setUIConfig('white', 'black', 'Arial', '13px');
    wave.loadWave('googlewave.com!w+' + waveid);
    wave.init(document.getElementById(div[i].id));
    }
    }
    </script>
    

    then in the Title mention "WAVE CODE" or any thing which can be used to identify the gadget in the Page Elements and click on "SAVE" button to save the Gadget.
  • After this move the newly added HTML/ Javascript gadget at the bottom of all the page elements (in the side bar, if there are more side bar then put it in the right most side bar) so that this code will be executed at the end.
  • Then click on the "SAVE" button to save the Page Elements Layout
  • After this you can add following code for the every wave you would like to embed in the new HTML / Javascript gadget (Note: Here you need to replace wave Id of your wave in place of <WAVE_ID> and you can change the value of height and width as per your requirements see the examples).

    <div id="wave_<WAVE_ID>" style="width: 300px; height: 500px"></div>
    

    Examples:


    <div id="wave_ZZjLgImEV" style="width: 560px; height: 420px"></div>


    <div id="wave_ZZjLgImEV" style="width: 500px; height: 200px"></div>


    <div id="wave_ZZjLgImEV" style="width: 450px; height: 250px"></div>
    
  • Then click on "SAVE" button to save this gadget and now you can move this HTML / Javascript gadget to any where in your page elements layout and save the template.

Share |
Showing posts with label howto. Show all posts

Friday, December 18, 2009

Detailed Google Wave FAQ - Frequently Asked Questions + Tips & Tricks + Hacks


Google Wave Frequently Asked Questions and Tips and Tricks... Please wait till it is being loaded

Share |
Showing posts with label howto. Show all posts

Google Wave FAQ - Frequently Asked Questions


Google Wave Frequently Asked Questions and Tips and Tricks... Please wait till it is being loaded

Share |
Showing posts with label howto. Show all posts

Saturday, December 12, 2009

Embed Multiple Wave Website Webpage


I have explained the way to embed a single wave in to website or web page or blog, here I am going to explain the way to embed multiple waves in to website or web page based on the code at http://pastebin.com/f6894ebaa.

  • Edit your website or web page place the following code just before </body> tag:

    <script src="http://wave-api.appspot.com/public/embed.js" type="text/javascript"></script>
    <center><a href="http://technical-tejash.blogspot.com">Embed Wave to Website or Web Page</a></center>
    <script type="text/javascript">
    /* Embed Google Wave Script v2.0
    Re-writen by: Jayson Ragasa, Baguio City, Phillipines
    Original Version (V1.0) from Mr Embeddy: embeddy@appspot.com
    this JS code is for Blogspot only
    */
    var div = document.getElementsByTagName('div');

    for (var i = 0; i < div.length; i++) {
    if( div[i].id.substr(0, 5) == 'wave_' ) {
    var waveid = div[i].id.substr(5, div[i].id.length-5);

    var wave = new WavePanel('https://wave.google.com/wave/');
    wave.setUIConfig('white', 'black', 'Arial', '13px');
    wave.loadWave('googlewave.com!w+' + waveid);
    wave.init(document.getElementById(div[i].id));
    }
    }
    </script>
  • Note: You need to place the above code once only, then you just need to add div tags for the all the waves you want to embed at the required locations as mentioned in the following steps.
  • Once you placed above code, find the wave id of all the waves which you want to embed (To know how to get your wave ID click here)
  • Note: You must make the Wave public before embedding it to any where
  • Once you know the wave ID of your Wave then embed div elements as mentioned in the following code to particular place where you would like to embed those waves (Note: Here you need to replace the <WAVE_ID> with the actual wave id of your public wave and you can change value of height and width according to your requirements):

    <div id="wave_<WAVE_ID>" style="width: 300px; height: 500px"></div>
  • Examples:
    <div id="wave_ZZjLgImEV" style="width: 560px; height: 420px"></div>

    <div id="wave_ZZjLgImEV" style="width: 500px; height: 200px"></div>


    <div id="wave_ZZjLgImEV" style="width: 450px; height: 250px"></div>

  • The save it and upload it to the required location if required and your are done with it.

Share |
Showing posts with label howto. Show all posts

How To Embed Wave in to Website or Webpage or blog?


The google's guide to embed wave (at http://code.google.com/apis/wave/embed/guide.html) seems to be not easy to understand by the non technical person or the person. Here is simple and step by step guide to embed the wave.

  • Get the Google wave id using this tutorial click here
  • Open the source code of your Web Page or Website. Or if you are having blog then open HTML template for the blog.
  • Search tag which is not case sensitive. Just before this tag paste following code and put the id of your wave in place of "waveIdD" e.g. "ZZjLgImEV":

    <script type="text/javascript">
    function initialize() {
    var wavePanel = new WavePanel('http://wave.google.com/wave/');
    wavePanel.loadWave('googlewave.com!w+waveID');
    wavePanel.init(document.getElementById('waveframe'));
    }
    </script>


  • Now place the following code where you want to embed the wave:
    <div id="waveframe" style="width: 400px; height: 100%"></div>

    Note: Here you can change the value of height and width according to your requirements.
  • Then finally search tag and add the initialize() method to onLoad of the body as follows:
    <body onload="initialize()">
  • Everything is done now you can save and for website or webpage upload it to the desired location. For the blog just same the template and you are done with it.

Share |
Showing posts with label howto. Show all posts

Friday, December 11, 2009

What is WAVE ID and How to Get Wave ID of your wave?


What is Wave ID?
Ans: Wave ID is unique ID of the Wave which you can use to embed the particular Wave into your Website, Web Page or blog or any thing else.
I have written article on creating public wave and how to embed wave in to website or blog. Here I need to explain how can you get Wave ID which you can use to share your wave on website or blog.

  • Log in to http://wave.google.com
  • Then go to Inbox or All to get list of waves
  • Click on the wave to open the wave
  • Once the wave is opened you can get the wave's unique URL from the address bar which will be similar "https://wave.google.com/wave/#restored:wave:googlewave.com!w%252BZZjLgImEV.2"
  • This URL will end with "googlewave.com!w%252BZZjLgImEV.2" here what ever after "googlewave.com!w%252B" and before dot "." i.e. "ZZjLgImEV" is the wave id for my wave.
  • Note: the unique URL can be "https://wave.google.com/wave/#restored:wave:googlewave.com!w%252BZZjLgImEV.1" or "https://wave.google.com/wave/#restored:wave:googlewave.com!w%252BZZjLgImEV" also i.e. it can end with .1 or .2 or .3 .. Or if it does not have dot "." at the end then any thing after googlewave.com!w%252B is the wave id.

Share |
Showing posts with label howto. Show all posts

Wednesday, December 09, 2009

How to Add friends on google wave to your contacts?


Google wave currently restricts that you can share a Wave with your contacts only. That means you can add new people on your wave only if they are on your contact list. Here is simple step by step guide to add a Google wave user to your contacts.

  • Login to wave.google.com
  • Once the wave is loaded you can see contacts list at the bottom left part of the wave as shown in the bellow image.

  • Click on the + icon / button the bottom of contacts. Type the your friends Gmail id or Google Wave id in the text box. If this user has google wave account then submit button is enabled and you can add this user to your contact by pressing submit button.

Share |
Showing posts with label howto. Show all posts

Monday, December 07, 2009

How to create new wave on Google Wave?


Here is very simple step by step guide to know how can you create new wave on Google Wave?

  • Login to http://wave.google.com
  • After successful login you can find "Navigation" panel on the left side of the screen. You can select "Inbox" or "All" from the Navigation panel. Which will display waves you have subscribed on the right side of Navigation panel. And on the top of it you can find the button "New Wave"
  • Click on "New Wave" button to create new Wave.
  • Here you can type any kind of message or information you need to share with your friends. You can also attach images or any file over here. Once everything is done click on "Done" button to finish and let your friends view your changes.
  • You can add one or more friends to the newly created wave or existing wave by clicking "+" button as shown in the images.


Share |
Showing posts with label howto. Show all posts

Friday, December 04, 2009

Creating Public Wave : How To Make your wave as Public Wave or Provide Everyone Access on Google Wave?


Finally, I got invitation from Google to access the Google Wave. It is really gr8 way to communicate with the people on Google Wave. Currently you can get Google Wave by invitation only either form Google or if your friend who has Google Wave can invite you. I and many of my friend got the wave, I was just experimenting Google Wave features and gone though wave help article http://www.google.com/support/wave/bin/answer.py?hl=en&answer=162099 to create public wave.

This seems to has insufficient information. I search on Google and found out a way to create a Wave with public access or grant existing wave to public access. Hence, I thought of writing this article to provide complete information about creating public wave or granting public / everyone access to existing wave.


As per Google Help you need to add "public@a.googlewave.com" to your wave and your wave will become public as shown in the bellow images. But many users are getting error "public@a.googlewave.com is not a Google Wave account." as shown in the bellow image.


There is an alternate solution you can try to add the "public@a.googlewave.com" in your google wave contact list. This may fail by showing following error.


In this case there is another work around using a bot "easypublic@appspot.com" to make your wave public. Add "easypublic@appspot.com" in your wave

And it will make your wave a public wave by automatically adding "public@a.googlewave.com" in to your wave.


Note: You might need to add "easypublic@appspot.com" to your contacts before adding it to Wave as follows:

Share |
Showing posts with label howto. Show all posts

Friday, June 26, 2009

Open Social: How To Migrate old URL of App / Gadget / Widget to New URL ?


I received email from Google Pages stating that they going to move to Google Sites and when I check further Google Sites doesn't support files like XML, HTML, CSS, JS. Now, here the problem begins since I have hosted most of my Google and Orkut Apps on Google Pages. Similar issue with geocities.com which is also going to be closed soon, and their also I hosted some apps XML, CSS and JS files.

I can figure out the place where can I host my files but I can not find any way on iGoogle or Orkut to change the origianl URL of my App, Gadget and Widget to something new. But in last few days I found the way to migrate the old URL to new URL and here are some simple step by step gude for both iGoogle and Orkut sandbox.

For hosting XML file
You can use Google Gadget Editor to host all XML files of your gadget. [Click Here]
To host other files like images, CSS, JS please refer some free hosting site here
And then make relavant changes in your open social XML file

Migration for iGoogle Gadgets / Widgets

There are two methods that you can use to create a gadget alias:

  1. You can use the gadget alias request form here.
  2. Submit a request to email [sites-migration@google.com] (will take longer than option 1).
Migration of Orkut Apps

Some important things to remeber befor migrating Orkut Apps
1. You must have claimed ownership of the existing app.
To claim ownership of an app, visit http://www.google.com/gadgets/directory/verify
2. You be logged in with the account with which you claimed ownership.
3. The existing app must be a featured app on Orkut.
4. The new application URL must NOT have been used as an app on ANY google container -- including orkut, iGoogle, etc.
Note: This is very important, otherwise the migrate request will fail. It is recommended that you create an absolutely new and unique URL when migrating. Unfortunately, this also means that you cannot test the new app URL on sandbox before issuing a migrate request.

Step for migratting Orkut Apps
1. Visit http://sandbox.orkut.com/AppUrlMigrate.aspx
2. Type in your existing app url and the new URL to migrate to.
3. Check the exisiting and new app URLs. (see attached screen shot)
4. Double check - (you really don't want a typo in the new URL).
5. Hit the submit button.
6. A migration confirmation message will appear.
7. The migration changes will propagate through caches and will be live in 24 hours.
Caution: If you use the same existing app URL on any other google property, this migration request will have an effect on the other property.

Source: http://orkutdeveloper.blogspot.com/2009/06/app-url-migration-tool-available.html

Share |
Showing posts with label howto. Show all posts

Monday, April 27, 2009

How to Unsubscribe Gooogle Gorups? - Dont want to receive email from google group


Many people are asking that how do I unsubscribe a Google Group?
There are 2 ways to unsubscribe the Google Group.

  • Check you are receiving email from the Google Group.
  • Go to the bottom part of the email it would be something similar to bellow image.
  • You can see the line "To unsubscribe from this group, send email to" after this there will be one email id mentioned you need to send blank email to that email id from the same email account using which you have subscribed to the Google group. e.g. as shown in above image you need to send blank email to blogger-general-discussion+unsubscribe@googlegroups.com to unsubcribe from blogger-general-discussion
Method 2

  • Open any email which was arrived from Google Group which you wanted to unsubscribe.
  • Go to bottom part of the email there you can see link "For more options, visit this group at" and followed by it there is link to the Google Group. Click on that link

  • You will find Google Group's page as shown in bellow image
  • In this click on Edit Membership at the right side bar
  • This will take you to the edit membership page as shown in bellow image
  • If you do not wish to unsubscribe the group and just wanted not to receive email from group then select option "No Email" in the above page and click on "Save Settings" button
  • If you want to unsubscribe this group then click on Unsubscribe button and follow the instructions

Share |
Showing posts with label howto. Show all posts

Tuesday, January 20, 2009

HOWTO Open Windows Explorer with Single Pane


HOWTO Open Windows Explorer with Single Pane

In Microsoft Windows Vista by default you have double pane window as shown in the image. But if you would like to switch back to classic Single Pane view for the Windows Explorer perform the following steps:

  1. Go to Start Menu -> Run
  2. Type regedit and press enter key
  3. This will open Registry Editor
  4. Now navigate to
    HKEY_CLASSES_ROOT\Folder\shell\explore\ddexec
  5. Double click on the (Default) and change the string to
    [ ViewFolder (“%1” , %I, %S) ] (including the brackets )
Note:
To revert to the double pane window, set (Default) to
[ ExploreFolder(“%1” , %I, %S) ]

Share |
Showing posts with label howto. Show all posts

Friday, July 04, 2008

Youtube Video Downloader softwares


YouTube Videos can be downloaded easily using Various Online / Off line Web Tools. There are many web based online tools to download YouTube Videos Online.Watch out for some cool free software to download youtube videos.

Windows Based
YouTube Video Downloader


1. VDownloader is a desktop application that catches YouTube, Google Video, and Grinvi video links from your clipboard. Start it up, copy the video URL and click download. It automatically converts the videos to mpeg or avi formats.
2. YouTube Grabber downloads files from Youtube in .flv format. Copy and paste the URL of a video from YouTube into the program, press «grab», and the file will be downloaded into the same directory as the program.
3. Orbit Downloader is a desktop application which can download videos from a wide variety of sites. The download process is very simple, just hover your mouse over the video and you’ll get a button that says «Get It». The developers of the program claim that it’s very fast (up to 500% faster, they say) due to its P2P download technology.
4. My Video Downloader. With all these free tools, it’s actually funny to see a commercial one. It’s called My Video Downloader, and while it does look solid and offers a lot of conversion options (a free trial which enables you to download 10 videos is available), we’re not sure it offers enough to warrant a price tag.
5. KeepV is a desktop downloader as well as a converter, which can convert the downloaded videos from flv to avi, mov, mp4, or 3gp formats.
6. VideoGet boasts being able to download video clips from more than 100 video sharing websites. We haven’t tested all of them, so we’re just going to take their word for it. It’s a deskop application with a nice, simple interface, and a solid number of options.
7. TubeSucker is a desktop YouTube video downloader with some interesting options, including batch downloading large amounts of videos from a certain user. See the video tour on the site.

Share |
Showing posts with label howto. Show all posts

How To Embed Comment Box in Blogger Post Like Wordpress


Please go through following instruction for embedding comment box in the blogger post.

1. To turn on the embedded comment form, log in to Blogger Draft

2. Go to Settings > Comments for your blog. Just change it to “Embedded below post” save your settings.


Adding comment box below blogger post


1. Go to Layout>Edit HTML in your blog’s dashboard and check the “Expand widget templates” box. Then search for below code in yours templates :


2. Change the above code with below code .

or Copy Code From Here

3. Save your Templates and Done
Unfortunately This feature is not enabled for customized or third party template, To make this trick enable in customize template you will need to make a small change to your template code for displaying comment below blogger post as suggested by scrapur.

Cheers !!! Just Comment me if you have any ???

Share |
Showing posts with label howto. Show all posts

How to create Orkut Application


How to create Orkut Application


Orkut Application Tutorial:-

Congratulation developers finally Orkut launch Orkut Apps for Indians. Now you can create your own Application on Orkut.
Before creating Orkut apps you need to understand in which platform it works.
Orkut Application works on xml and to know about xml click here.
Orkut apps work on a different style of xml and it uses its own google libraries.


If you want to make your own Orkut Application then follow the instructions:-

1. First of all you need to become member of http://sandbox.orkut.com/
2. For this you have to apply for developer from http://code.google.com/support/opensocialsignup/
3. It will take around 48 hours for confirmation.
4. After confirmation you can start making your Orkut Apps from http://sandbox.orkut.com/MyApps.aspx.
5. After reaching http://sandbox.orkut.com/MyApps.aspx you can see "add application" button. So enter your xml url here and you can see your Orkut Apps.
It will look like this.

6. After creating your apps submit your apps in Orkut Directory.

Share |
Showing posts with label howto. Show all posts

Tuesday, July 01, 2008

Microsoft Excel How TO Tips and Tricks


You can add some number of days to a date by simply using the =SUM function. Since Excel stores dates as
a number of days, no further work is required. For example, to add 5 days to
1/1/98, in A1, use =A1+5,
which gives
1/6/98.
To add a number of months or years to a date, you first need to decompose the initial date into its year, month,
and day components, add in the desired offset, and then have Excel put the components back together.
For example, say you have a date in A1, to which you want to add 3 months and 4 days. You'd use the following formula:

=DATE(YEAR(A1) , MONTH(A1)+3, DAY(A1)+4)
Excel will automatically handle the situation which arises when you pass a number greater than 12 to the MONTH function, or a number greater than 31 to the DAY function.
For example, adding 6 months and 10 days to 8/25/97, in A1 with the formula
=DATE(YEAR(A1) ,MONTH(A1) +6, DAY(A1)+10)
gives 3/7/98.
Generally, you cannot add two dates that are in serial format. For example, adding 1/15/1998 and 6/15/1998 gives 6/30/2096, which is essentially meaningless. If you want to add some number of days to a date, but exclude weekends and holidays, you can use the WORKDAY function, which is part of the Analysis Tool Pack.
Note, however, that adding a month to a date may give you a result that you do not expect. For example, suppose A1 contains the date 31-Jan-2002. If you use the formula
=DATE(YEAR(A1) , MONTH(A1)+1, DAY(A1))

you will get the date 3-March-2002, because the "31st" day of February, 2002, is 3-March. The formula below will work around this issue, returning the last day of the next month if the date in A1 is a day that does not exist in the next month.
=DATE(YEAR(A1) ,MONTH(A1) +1,MIN(DAY( A1),DAY(DATE( YEAR(A1), MONTH(A1) +2,0))))
For example, if A1 contains the date 31-Jan-2002, this formula will return 28-Feb-2002. It is important that you and your users understand what "one month later" means in the context of your workbook.


Calculate Due Date

Let's say you have a bill due every 6 months.  To calculate the next due date from the current date in cell A1 you would use this formula.
=DATE(YEAR(A1) ,MONTH(A1) +7,0

Calculate the number of days in a month

Excel lacks a function for calculating the number of days in a particular month, so you'll need to construct your own formula.
If cell A1 contains a date, this formula will return the number of days in the month:
 

 =DAY(DATE(YEAR( A1),MONTH( A1)+1,1)- 1).

Computing Age

Computing someone's age from their birthday is simple, using the =DATEDIF function. Suppose that a person's birthday is in A1. The following will return their age in Years, Month, and Days:
=DATEDIF(A1, NOW(),"y")&" Y, "& DATEDIF(A1,NOW( ),"ym")&
" M, " & DATEDIF(A1,NOW( ),"md") & " D"

Convert Date Cell into 3 Columns

If your date is in A1:
(eg;
05/01/2005)
B1: =TEXT(A1,"dd" )
C1: =TEXT(A1,"mmm" )
D1: =TEXT(A1,"yyyy" )

How can I calculate future dates in Excel?

Excel can be used to quickly calculate future dates.
For example:
Enter a date in cell A1 (type =NOW() to use today's date); the date will be displayed according to the number format applied to the cell.
In cell B1, enter =A1 + 7 to calculate the date one week later.

Excel's Autofill feature can be used to display a list of dates using the same calculation ( e.g. a list of dates 7 days apart). To do this, select the cell which contains the calculation (e.g. cell B1) and drag the SMALL', OFFSETX, 16, OFFSETY, 16, BGCLASS, 'lore_glossary_ term_popup', FGCLASS, 'lore_glossary_ term_popup_ definition', TEXTFONTCLASS, 'lore_glossary_ term_popup_ definition', CAPTIONFONTCLASS, 'lore_glossary_ term_popup_ caption'); }" onmouseout=" function anonymous() { nd(); }" href="javascript: void( 0);"> small black box in the lower-right corner of the cell down or across some cells. Release the mouse button to display the list of dates.

How to Accumulate Hours and Minutes Greater Than 24 Hours

If you want to correctly display a time greater than 24 hours, you can use the 37:30:55 built-in format. If you want to use a custom format instead, you must enclose the hours parameter of the format in brackets, for example:
   [h]:mm  

How to Calculate Elapsed Time

When you subtract the contents of one cell from another to find the amount of time elapsed between them, the result is a serial number that represents the elapsed hours, minutes, and seconds. To make this number easier to read, use the h:mm time format in the cell that contains the result.

In the following example, if cells C2 and D2 contain the formula =B2-A2, and cell C2 is formatted in the General format, the cell displays a decimal number (in this case, 0.53125, the serial number representation of 12 hours and 45 minutes).

   A1: Start Time   B1: End Time    C1: Difference  D1: Difference                                          (General)       (h:mm)     A2: 6:30 AM      B2: 7:15 PM     C2: 0.53125     D2: 12:45      
If midnight falls between your start time and end time, you must account for the 24-hour time difference. You can do this by adding the number 1, which represents one 24-hour period. For example, you might set up the following table, which allows for time spans beyond midnight.
   A1: Start Time    B1: End Time    C1: Difference  D1: Difference                                           (General)       (h:mm)     A2: 7:45 PM       B2: 10:30 AM    C2: 0.61458333  D2: 14:45      
To set up this table, type the following formula in cells C2 and D2:
     =B2-A2+IF(A2>B2,1)  

How to Convert a Date to Its Decimal Number Equivalent

To convert a serialized date (h:mm:ss) to a decimal number (0.00), you must convert the serial number to a decimal by converting to a 24-hour base. You do this by multiplying the time by 24 as follows
     =Time*24


The result is 4.5.


If the cell contains both a

 date and a time, use the following formula:   

=(Time-INT(Time) )*24
For example, if cell A1 reads "6/20/96 4:30 AM", the formula is:   

=(A1-INT(A1) )*24
The result again is 4.5.

How to Find the Number of Days Between Today and a Future Date

To find the number of days between now and a date sometime in the future, use the following formula
     ="mm/dd/yy"-NOW()  
where "mm/dd/yy"var> is the future date. Use the General format to format the cell that contains the formula

How to Find the Number of Days, Months, and Years Between Two Dates

To calculate the number of days, months, and years between two dates, where the start and end dates are entered in cells A1 and A2 respectively, follow these steps:
1. Create a new workbook
2. Type the following data in the workbook:
   A1:   

 03/25/94      A2:    05/01/98       
3. Type the following formula in cell D1:
  =YEAR(A2)-YEAR( A1)-IF(OR( MONTH(A2)   DAY(A2)   <=MONTH(A1),DAY( A2)   >=DAY(A1)),12, IF(AND(MONTH( A2)>MONTH(A1),DAY( A2)   "&A2-DATE(YEAR( A2),MONTH( A2)-IF(DAY( A2)        
NOTE: If you copy and paste this formula, make sure that there are no line breaks, or the formula will not work.
If you typed the formula correctly, cell D1 now displays:
       4 years, 1 months, 6 days  

How to Find the Number of Weekdays Between Two Dates

To find the number of weekdays between two dates, where the start and end dates are typed in cells A1 and A2 respectively, follow these steps:
1. Create a new workbook.
2. Type the following data in the workbook:
   A1:    03/25/94      A2:    05/01/98       
3. In cell D1, type the following formula:
   =NETWORKDAYS( A1,A2)       
1,071 is the result.

How to Increase Dates Incrementally

To increase a date by a number of years, months, or days, use the formula
    

 =DATE(YEAR(referenc e)+value1, MONTH(reference) +value2,DAY( reference) +value3)      
where reference is either the date value or cell reference that contains the date, and value1, value2, and value3 are the increments by which you want to increase the year, month, and day, respectively.

For example, to increase a date by one month, the formula is:

   =DATE(YEAR(DATEVALU E("6/20/96")),MONTH(DATEVALUE("6/20/96"))+1,      DAY(DATEVALUE("6/20/96")))  

Share |

No comments yet

Topics

 
Embed Wave to Blogger