Wednesday, March 25, 2009

Sanwa new Throat Microphone


Used mainly by tactical assault groups and SWAT teams, throat microphones are something you rarely see on the street. This will change now with Sanwa's latest hands free system, a Japanese phone design based on a military throat microphone.
It might not be used all the time, but if you work in a noisy environment it could greatly improve a phone conversation.


Via: Link

Share |

Monday, March 23, 2009

HOW to Add Poll to Blogger / Blogspot Blog


If you want to conduct some survey for your blog visitors, blogger provides Poll Gadget for that you can use that. To add Poll Gadget / Widget yo your blog please follow bellow steps:

  1. Go to Layout -> Page Elements for your blog
  2. Here click on "Add a Gadget" or "Add a Widget" in the section where you wanted to add the Poll Gadget or Widget
  3. The pop up will open in that scroll down and you will find Poll Gadget or Widget click on '+' button for the Poll as shown in the image
  4. This will open Create a poll dialog box as shown in the image.
  5. Here you can specify the Question and the answers which visitors can select and click on Save button
  6. Now move this Gadget or Widget in the Layout wherever you want and click on Save Button at top right and every thing is done
  7. After saving the poll and template wait for 10 minutes then you can view your blog and able to see the poll created on the blog

Share |

Not able to Post Comments : Comments not working in blogger with custom template


I have experienced the problem with comments when I have switched to custom template from blogger's standard template. If you are using blogger's custom template and no body is able to post comments on you blog then please check bellow settings for the comments first:

  1. For the blog which you are not able to see the comments, from Dashboard go to Settings -> Comments here you check following comments settings are proper
  2. Comments --- Show is selected
  3. Who Can Comment? --- Here select Anyone or Registered Users as
  4. Comment Form Placement ---
  5. Comments Default for Posts --- New Post Have Comments
Please make sure above settings are done then save the comments settings and check whether are you able to post the comments or not?

If still you are not able to post the comments then please perform following steps:

  1. For the blog which you are not able to see the comments, from Dashboard go to Layout -> Edit HTML
  2. Select check box
  3. Now from the HTML template search for word "Post a Comment"
  4. This word should be between <a expr:href='data:post.addCommentUrl' target='_blank'> and </a> (i.e. it should be like <a expr:href='data:post.addCommentUrl' target='_blank'> Post A Comment </a> ) if Post A Comment words are between some other HTML tags then change it to as given in sample
  5. Click on Save Template button
Now you are able to post the comments on your blog.

Note: If still your are finding problem with posting comments on your blog then you should contact the custom template provider for more details

Share |

Sunday, March 22, 2009

Fruit Powered Clock


This is the eco-friendly Fruit Powered Clock, combines micro-electronic technology with the natural electrical potential of a fresh fruit or vegetable. The Fruit Powered Clock is available at $18. Though it is in an affordable price but I’m not wasting any apple nor getting rotten apple. But for fun maybe I can consider about it.

Via : Link

Share |

Tuesday, March 17, 2009

Email Subscription For TypePad / TypePad (Japan) Blog using Feed Burner


On my blog you can see Email Subscription option for visitors. This is very useful for visitors who is willing to receive updates of my blog via email (This email address can be any email address not just Gmail)

To configure email subscription first make sure following things:

  1. You must have feedburner.com account if not click here
  2. You must have customized your blog's feed using feedburner feed if not click here
After all these you can follow bellow steps to add email subscription option to blogger's blog.
  1. Log in to feedburner.com and from home page click on the feed name you wanted to customize.
  2. Click on "Publicize" tab
  3. Click on "Email Subscriptions" link and if you have not yet activated email subscription feature than click on "Activate" button
  4. After activation is done you can see the screen as bellow
  5. In this screen select "TypePad" or "TypePad (Japan)" option in the drop down for "Use as a widget in" and click on "Go!" button
  6. This will redirect ti TypePad Login page. Login using your TypePad account and follow the steps.
Related Articles:
  1. How to create Feed Burner account ?
  2. How to customize blogger's or TypePad's feed using feed burner ?
  3. How to redirect your Blogger feed to your FeedBurner feed ?
  4. How to provide email subscription option for Blogger or blogspot blog using Feed Burner ?

Share |

Email Subscription For Blogger / Blogspot Blog using Feed Burner


On my blog you can see Email Subscription option for visitors. This is very useful for visitors who is willing to receive updates of my blog via email (This email address can be any email address not just Gmail)

To configure email subscription first make sure following things:

  1. You must have feedburner.com account if not click here
  2. You must have customized your blog's feed using feedburner feed if not click here
  3. You must have redirected blogger's feed URL to newly customized feed URL of the feed burner
After all these you can follow bellow steps to add email subscription option to blogger's blog.
  1. Log in to feedburner.com and from home page click on the feed name you wanted to customize.
  2. Click on "Publicize" tab
  3. Click on "Email Subscriptions" link and if you have not yet activated email subscription feature than click on "Activate" button
  4. After activation is done you can see the screen as bellow
  5. In this screen select "Blogger" in the drop down for "Use as a widget in" and click on "Go!" button
  6. It will redirect to blogger's "Add Page Element" Page
  7. On this page select the blog where you wanted to add email subscription option at "Select a blog" drop down list
  8. You can also specify the "Title" for this Gadget / Widget
  9. If you know HTML and you want to customize how the Email Subscription Gadget /Widget should look at you blog using HTML code than click on "Edit Content" link and and modify the HTML code as per you requirements, if you do not know HTML then must skip this step
  10. After this click on "Add Widget" button and Email Subscription Gadget / Widget gets added to your specified blog and you can see Layout of your blog as bellow
  11. You can drag your email subscription Gadget / Widget to any where you wanted to place on your blog using mouse.
  12. Finally you can click on "Save" button and every thing is done
  13. Now if you open your blog you can find email subscription Gadget / Widget on your blog.
Related Articles:
  1. How to create Feed Burner account ?
  2. How to customize blogger's feed using feed burner ?
  3. How to redirect your Blogger feed to your FeedBurner feed ?
  4. Email Subscription For Typad Blog using Feed Burner

Share |

How do I create customized feed a Blogger / Blogspot / TypePad blog using Feed Burner ?


Feedburner.com gives you option to customize the feed for your blog, and you can give visitors to subscribe via email and also track visitors and how many people had subscribed to your feed. It also give lot of customization options. Here I will explain how you can use feedburner for providing email subscription option to your blog.

If you do not have feed burner account then, please follow the steps to create the feedburner account.

Now follow these steps to create customized feed for blogger blog

  1. Login to feedburner.com and you will go to home page.
  2. Here type your default feed URL in the text box as shown bellow (Note: if you have blogger blog then your feed URL will be like http:///feeds/posts/default for example for my blog URL is http://technical-tejash.blogspot.com/ so my feed address is http://technical-tejash.blogspot.com/feeds/posts/default for TypePad blog you can specify the default feed for the TypePad blog)
  3. Select a check box I am a podcaster! and click on Next button.
  4. It will open bellow screen, here you can edit the Feed Title and new Feed Address
  5. The Create or Sign In To Your FeedBurner Account page should appear.

  6. Also on this page, create a FeedBurner account by picking a username and password and supplying your email address.

    When you've supplied all the required information on this page, click Activate Feed ». A "Congrats" page should appear.

  7. Read all of the information on "Congrats", then click Next » to continue with the setup process.

  8. If you selected "I am a podcaster" on the homepage, configuration options for our SmartCast service will appear. Here you can supply categories and other information for iTunes, append a copyright message, and submit your podcast to Yahoo! Search.

    When you are finished, click Next ». Configuration options for FeedBurner stats services should appear.

  9. On the stats configuration page, select the level of feed stats detail you want.

    Click Next » to finish the setup process and enter our feed management interface.

    You're now ready to make your FeedBurner feed available on your Blogger site!

Related Articles:
  1. Create Feed Burner account
  2. Redirecting your Blogger feed to your FeedBurner feed
  3. Providing Email subscription option for Blogger or blogspot blog using Feed Burner
  4. Providing Email Subscription for TypePad or TypePad (Japan) Blog using Feed Burner

Share |

Tracking 100% of your feed traffic: Redirecting your Blogger feed to your FeedBurner feed


Blogger can make sure all feed traffic for your blog content goes to your FeedBurner feed. This helps make sure your FeedBurner stats are comprehensive and accurate; even subscribers to the 'Original Feed' are routed through FeedBurner.

If you do not have feed burner account than create account using these steps

First customize you feed using feed burner: click here for more details

To redirect your feed:

  1. In a new browser window, sign in to your Blogger account.

  2. From the Blogger Dashboard, click the Settings link for the blog you want to promote.

    The Settings page for your selected blog should appear.

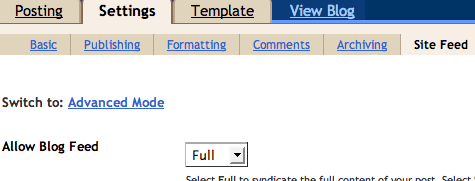
  3. Click the Site Feed link under the Settings tab.

  4. Type your complete FeedBurner feed address into the Post Feed Redirect URL text field.(Note: This is the URL which you have created at FeedBurner customized feed. You can find it using "Edit feed details" link for your blog.) Make sure you type in your entire feed address including the "http://" portion.

  5. Click Save Settings.

    You should see the message "Settings were Saved Successfully".

  6. Blogger will now redirect all feed traffic for your blog to your FeedBurner feed.

Related Articles:
  1. Create Feed Burner Account
  2. Customize blogger's feed using feed burner
  3. Providing Email subscription option for Blogger or blogspot blog using Feed Burner
  4. Providing Email Subscription for TypePad or TypePad (Japan) Blog using Feed Burner

Share |

Creating Feedburner account for Feed Redirection of Blogger / Blogpot / TypePad Blog


Feedburner.com gives you option to customize the feed for your blog, and you can give visitors to subscribe via email and also track visitors and how many people had subscribed to your feed. It also give lot of customization options. Here I will explain how you can use feedburner for providing email subscription option to your blog.

Please follow the steps to create the feedburner account.

  1. Go to http://www.feedburner.com/fb/a/home Now changed to http://feedburner.google.com/fb/a/myfeeds
  2. Click on Register link at the top near right side
  3. This will open Google's login page. If you have Google id then login with that other wise click on the Create Account link bellow.
  4. Once you login with Google Account, you will be redirected to FeedBurner's home page
  5. Finally you have created Feed Burner account.
Update: If you have Google Account then you do not need to create feedburner account since Feedburner is now part of Google.  You can just go to http://feedburner.google.com/fb/a/myfeeds and login with Google Account.
    Related Articles:
    1. How to customize blogger's feed using feed burner ?
    2. How to redirect your Blogger feed to your FeedBurner feed ?
    3. How to provide email subscription option for Blogger or blogspot blog using Feed Burner ?
    4. How to provide email subscription for TypePad or TypePad (Japan) Blog using Feed Burner ?

    Share |

    Friday, March 13, 2009

    Increase Click Through Rates - CTR for ads : Where should I place Google ads on my pages?


    The best location for Google ads varies from page to page, depending on content. Here are a few questions to ask yourself when considering where to position your ads:
    • What is the user trying to accomplish by visiting my site?
    • What do they do when viewing a particular page?
    • Where is their attention likely to be focused?
    • How can I integrate ads into this area without getting in the users' way?
    • How can I keep the page looking clean, uncluttered and inviting?
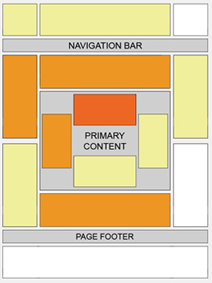
    Certain locations tend to be more successful than others. This "heat map" illustrates the ideal placing on a sample page layout. The colors fade from dark orange (strongest performance) to light yellow (weakest performance). All other things being equal, ads located above the fold tend to perform better than those below the fold. Ads placed near rich content and navigational aids usually do well because users are focused on those areas of a page.

    While this heat map is useful as a positioning guideline, we strongly recommend putting your users first when deciding on ad location. Think about their behavior on different pages, and what will be most useful and visible to them. You'll find that the most optimal ad position isn't always what you expect on certain pages.

    For example, on pages where users are typically focused on reading an article, ads placed directly below the end of the editorial content tend to perform very well. It's almost as if users finish reading and ask themselves, "What can I do next?" Precisely targeted ads can answer that question for them.

    Source : https://www.google.com/adsense/support/bin/answer.py?answer=17954&sourceid=aso&subid=ww-ww-em-hyd_nl1&medium=email

    Share |

    Increase visitors using Google, Yahoo, MSN, Live, Altavista, Alexa and many more search engines


    If you have blog or website from long time and you are worried why visitors are not coming to your blog then one reason many be you have not submitted you website to various search engines

    Search engines like Google, Altavista and Yahoo search the Internet and find your web site through links from other web sites. This is another reason to build a strong network of relevant... quality sites that link to yours.

    Free Submit Your URL to search engines list

    You can also submit your site free... when you add your url to a search engine requesting to be indexed. Below is an easy one stop search engines list of some of the top search engines where you can submit your site free.

    If your web site is linked to from other sites there may be no need to submit. If your web site has no links... use the submit site free pages here only once... then check your listing in 45 to 60 days. CAUTION: submitting again before 45 days will not help and may hurt your ranking chances if considered abuse by the search engine.

    Software that automatically submits your web site should be avoided. Only submit manually to the top search engines... that is where 80 to 90% of your traffic normally comes from.

    Have you seen Google™ Trends yet? Let's you compare traffic of different keyword phrases.

    Add your site or blog to Google free Google submit

    Yahoo Site Explorer allows you to explore all the web pages indexed by Yahoo! Search.

    submit site or blog to Yahoo for free
    Registration is required but it is free.

    register free MSN submit url or your blog or site here free MSN submit

    Submit a site - Exalead - Internet search engine ¤ Image search engine ¤ video search engine too.

    add url to Altavista Yahoo now feeds Altavista

    submit site free to AlltheWeb Yahoo now feeds AlltheWeb

    submit site free to Alexa

    submit your site to OhioBiz (Ohio sites only)

    Submit your blog to Google Blog search ping service


    Click for » Valuable Keywords Tool

    Share |

    Tuesday, March 10, 2009

    How to add Subscription Links to the Blogger.com / blogspot.com blog


    To improve visitors to you blog one thing you can do is keep you visitor noted when you are posting the new article on your blog. That thing you can do by providing the Subscription Links option to the users. Please follow the given steps to add Subscription Links to your blog.

    1. Login to to Blogger.com and go to Edit Template / Layout of you blog for which you wanted to provide subscription links
    2. Here click on the "Add a Gadget" link where you wanted to add the subscription links
    3. This will open the pop up as shown in the bellow image form there select Subscription Links (New!)
    4. This will open screen as bellow, there you can edit the Title for Subscription Links e.g "Subscribe To" as shown in the bellow image
    5. Now click on the "Save" button and Subscription Links gadget is added to you blog
    6. Now you can visit you blog and find Subscription Links gadget as follows

    Share |

    How to Add Logo to Blogger Blog


    Please go through following steps to add your own logo to the blogger.com or blogspot.com blog

    1. Log in to blogger.com
    2. Go to Dashboard
    3. Go to Edit Template / Layout of the blog for which you wanted to add the logo and you can see the following screen
    4. On this screen click on the "Edit" link in the Header portion as shown in the above image. If (Header) portion is not present for your blog then go to "Add a Gadget" link and from there add an
    5. The pop up will open as shown bellow. You can upload you logo image from you computer or provide the web location
    6. And Finally click on Save button and everything is done.

    Share |

    Friday, March 06, 2009

    How to Invite friends on flickr.com


    How to Invite friends on flickr.com

    Login to flickr.com with yahoo id you can see following home page (if you are logging in to flickr.com for the first time then click here) Now click on the small arrow next to Contact as shown in the bellow image


    After this you can see the drop down menu as shown in bellow image click on "Invite your friends"


    Now you can see following page here enter name and email id of the friends and click on "Send" at the down side of the page. Also select check box for "" and ""

    Share |

    Steps for Creating Account on Flickr with Yahoo ID


    Steps for Creating Account on Flickr with Yahoo ID

    Go to www.flickr.com
    and click on "Sign In" link on the top right as shown in bellow image


    Now you can see page as follows here you can login with your yahoo id and password
    If you are logging in first time to the flickr.com with yahoo id you can see following page to create account on the flickr. Click on the "Create A New Account" and you account will be created.Related Articles: How to Invite friends or family on the flickr.com

    Share |

    Topics

     
    Embed Wave to Blogger