Friday, May 30, 2008

Selective Expandable posts


Translations by other bloggers: Chinese, Thai

Earlier, I had announced Peekaboo posts which shows post summaries in main page and expands them in the main page itself. But, some people would still like to use the classic way of expanding posts which takes the reader to the post page upon clicking "Read more" link. One of them asked me how to display the "read more" link only for some long posts and not others. I gave him a combination of peekaboo and non-peekaboo code that serves this purpose. As I started getting more such requests, I thought I will post the code for everyone who wants to use. Here's what you need to do.

1. Find the

 tag in your template and add all the code from this page before it.

2. Find this div for the post-body and add the portion of code in red color.

expr:id='"post-" + data:post.id' >


Read More......


3. Goto Settings->Formatting and at the bottom, you will find the text box provided to specify the "Post template". Copy/paste these lines into that text box and save the settings. (Please DON'T type these lines yourself because you might introduce some spaces that will break the functionality)

Type your summary here

Type rest of the post here


If you create a new post now, it shows you clearly where to type the summary and where to add the rest of the post. Please note that you could also divide some or all of your old posts into summary and full post by editing them. The "Read more" link will appear only for the posts that have been divided like this.

Note 1: If you are not able to find the lines to change, you may not have expanded the template. Select the checkbox named "Expand Widget Templates", which is right above the template code, to expand it into more code.
Note 2: If you click "Older posts" link, the "Read more" link may appear even for the posts which you haven't divided into summary and full post. This is a known problem which we haven't solved yet.

I hope you will link to Hackosphere in your sidebar. That's the only thing I expect in return

Share |

Thursday, May 29, 2008

Generate Tiny URL - Hide original URL


Turn this URL:

http://www.mapquest.com/maps/map.adp?ovi=1&mqma
p.x=300&mqmap.y=75&mapdata=%252bKZmeiIh6N%252bI
gpXRP3bylMaN0O4z8OOUkZWYe7NRH6ldDN96YFTIUmSH3Q6
OzE5XVqcuc5zb%252fY5wy1MZwTnT2pu%252bNMjOjsHjvN
lygTRMzqazPStrN%252f1YzA0oWEWLwkHdhVHeG9sG6cMrf
XNJKHY6fML4o6Nb0SeQm75ET9jAjKelrmqBCNta%252bsKC
9n8jslz%252fo188N4g3BvAJYuzx8J8r%252f1fPFWkPYg%
252bT9Su5KoQ9YpNSj%252bmo0h0aEK%252bofj3f6vCP
into this tinyURL:
http://tinyurl.com/6
Which one would you rather cut and paste into your browser? That's the power of TinyURL!

Add TinyURL to your browser's toolbar

TinyURL Toolbar.

Click and drag the following link to your links toolbar.

TinyURL!
Once this is on your toolbar, you'll be able to make a TinyURL at the click of a button. By clicking on the toolbar button, a TinyURL will be created for the page you are currently at.

This is compatible with most web browsers and platforms as long as your bookmarks or favorites allow javascript. The links toolbar may not be visible in all setups and in most browsers, you can enable it in the View->Toolbars menu of your web browser. You can also put it in your bookmarks instead of the links toolbar.

Adding TinyURL to Favorites.

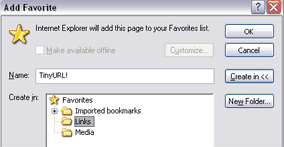
Can't drag and drop? For some users, such as some recent IE 6 installations, the clicking and dragging of links that contain javascript is no longer supported. To add this to your IE links toolbar, click the link with your right mouse button and select "Add to Favorites..." from the menu. Click OK if a security warning alert pops-up (this shows up since the link contains javscript). If a list of folders is not shown, click the "Create in >>>" button (see image at right). Now select the folder called "Links" and then click OK. You should now see the TinyURL on your links toolbar, if not, see the last paragraph above.

Redirection to any page in your site!

With TinyURL, you can also make a smaller URL that will work for any page on your site. Let's say that you have a website with the homepage that is at:

http://www.my-internet-isp.com/~myusername
Entering that URL into TinyURL will create a URL like
http://tinyurl.com/3
With this you can then redirect someone to anywhere within your site by appending a slash and the pages filename to it. So if you have a page at http://www.my-internet-isp.com/~myusername/my-links-page.html, you can use the URL http://tinyurl.com/3/my-links-page.html and going to this URL will forward the visitor to the page in your website.

Hide your affiliate URLs

Are you posting something that you don't want people to know what the URL is because it might give away that it's an affiliate link? Then you can enter a URL into TinyURL, and your affiliate link will be hidden from the visitor, only the tinyurl.com address and the ending address will be visible to your visitors.

Visit http://tinyurl.com/

Share |

Monday, May 26, 2008

Suzuki Hydrogen Fuel Cell Motorcycle


Folks at Suzuki have come with their latest concept and they’ve been spotted testing it, introducing the Suzuki Crosscage Hydrogen Fuel Cell Motorcycle. This motorcycle comes with no gears, no clutch and no emissions. This hydrogen fuel cell / electric hybrid two-wheeler might be the future of motorcycles. More pictures after the break.


[via Yanko Design]

Share |

Thursday, May 22, 2008

Classic Computer


The computer is collected from 19 " the monitor, old computer iron on the basis of P4, a power unit 350W, heaps ??????????? and copper sheets
And here that from this it has turned out.....


Share |

Tuesday, May 20, 2008

Google Using ToolBar Data To Find New Sites


Google ToolbarI’ve read a lot recently that Google is relying more and more on ToolBar data for determining SERPS, site quality, etc - as a matter of fact, Jeremy Shoemaker mentioned it just the other day in his post titled SEO Has No Future. So far though, the theory that Google is using this data is just that - theory. It makes sense. Why else would Google pay $1 for Firefox with Google Toolbar conversions? But as usual with Google, nobody knows for sure (until now?)

Proof That Google Is Using ToolBar Data:

Maybe this is already known by others, but it’s new to me so I’m writing about it because I think you can use it to your advantage - Especially if you create a lot of new sites and you want Google to get them indexed quickly.

A week or so ago, Mubin Ahmed was having trouble with his server. I offered to help and created an account for him on my dedicated server and imported his WordPress blog. He ended up getting another server so his account was only active on my box for a few hours. The only two people that knew the custom URL to the test-blog were Mubin and myself. I don’t think Mubin even visited the test-site, but I visited it several times using Firefox with the ToolBar installed. Once we got Mubin up and running on his own server, I deleted his test blog from my server and deleted the account - remember - total time online only a few hours.

Today while perusing my server logs I noticed something very odd: Several attempted hits to unique URLs that belonged to Mubin’s test-blog. All of those hits were from the Google Bot. The only way that Google could have known that those unique URLs existed is if they were captured while I was visiting those pages. This test-blog had no links from anywhere, and it was only online for a short time. To me this is proof that Google used the data collected via the Toolbar when I visited those pages to add them to the index.

So if you want your new sites found and indexed quickly, it looks like all you have to do is visit it a few times with your toolbar installed - getting a few of your friends to do the same thing might help too.

No biggie - but I thought I would share.

Share |

Firefox Referral Tracking Issue Confirmed As “Bug”


FirefoxThe last response I received from Adsense Support was “I’ve escalated your issue to one of our account pecialists for further investigation. We’ll get back to you shortly.” That was on Monday, and I still have not heard back from them.

However, a few days after the issue with Firefox Referral tracking first appeared on March 19th, I sent an email to my “inside” contact at Google. To protect his identity, I will refer to him as “Mr. G”. I was beginning to think that Mr. G would not respond to my message, but to my surprise, his reply popped-up on my iPhone this morning just before lunch. In part, he said:

I was told that there does seem to be a bug which is currently being addressed. I’ll forward you any response I get about the solution they implement.

So based on this exclusive information from “Mr. G” - Google is aware of this issue, it is a “bug” and it is not caused by “invalid clicks” as I was originally led to believe in my first response from Adsense Support.

So the good news is that it is a bug, which means the good people at the GooglePlex should have it worked-out soon. The bad news is that it is a bug, and it will be a while before it gets fixed - meaning many publisher’s income will continue to suffer until then.

UPDATE: Within days of this post, Adsense fixed whatever the issue was, and Firefox conversions and earnings are now back to normal. This has been confirmed by many other webmasters at the DP Forums. Google never made any announcement about the problem.

Share |

Make Money Online The Easy Way


A few months ago I gave AdBrite a try. Honestly the results were not very good and I stopped using it after about one month. The problem wasn’t really with AdBrite per-se, but more with the nature of our site and the visitors - but for some websites AdBrite performs very well. I think it is important to try different affiliate programs to find what works and what does not work for your site. Since most affiliate programs like AdBrite, Adsense, CJ, Kontera, etc are all free all you really have to lose is the amount of time you spend implementing them on your website.

Profiting from Others:
I had not used AdBrite for several months but decided to check my account to see what they were planning to do with the $2.68 I had earned while testing them on my site. I was surprised to see that my account balance was over $20! In going through my earnings report I found that these earnings were from affiliates. I had all but forgotten that almost a year ago we posted a how to make money on the Internet page at the site with an AdBrite referral on it - it was from these referrals that I was earning about $0.50/day. These earnings aren’t spectacular, but considering the amount of time invested, it’s not too bad.

If you haven’t tried AdBrite it’s worth a try. Even if it does not generate any direct income, try their affiliate program and let others do the work for you - it is by far one of the easiest ways to generate income from your site.


Share |

Automatically Check Your Adsense Stats


AdSense Notifier is a cool little add-in for Firefox that automatically checks your stats and displays them in the lower-right corner of your Firefox status-bar. Adsense Notifier in FirefoxIf you suffer from Adsense stat-check obsession like I do, then this little gem is a must-have. I started using the AS notifier about a year ago and and I can’t imagine living without it.

Installation is simple: First download Firefox. If you do notAdsense Notifier Settings have Firefox you can download it for free here: FIREFOX DOWNLOAD. After you have Firefox installed go to code.mincus.com and download the current version of Adsense Notifier. It is downloadable as a .XPI file which will automatically install itself as an add-in in Firefox (will not work in Internet Explorer). Once you have Firefox and Adsense Notifier installed, enter your Adsense account info and customize the settings to your liking. I set mine to update stats every 19 minutes.

Adsense Notifier is free.

Share |

Sunday, May 18, 2008

Top 10 Best torrent search and download


Your Ad Here

Here is the List Of Top 10 Torrent Sites ; They are Most Widely used on Internet for various Downloading Activities.


BiteNova : BiteNova is a free Torrent site with a Decent look and fast searching format.


Isohunt.com : Easy To Use and Handle. This is Now Availale Worldwide.


Torrentscan.com : It is Like a "meta-Torrent search" engine, which is a search engine that searches other search engines for Torrent.


Demonoid : This is One of my Favorite. Good For Searching Music and Movies.


Bitsoup Bitsoup is a growing P2P Torrent. As the trend towards private torrent sharing continues, you will need to signup and join as a member to participate in the Bitsoup swarm.


Fenopy : Torrent Search Engines For Movies, Music , Videos Files Mainly. A good torrnt Search Engines.


The Pirate Bay : Pirate Bay, by readership size, is the most popular torrent search site today. Pirate Bay has an immense database of 600,000+ torrents


Mininova.org Mininova is the successor to Suprnova, one of the original big torrent databases of the Web.


TorrentTyphoon.com : A unique bittorrent meta-search engine that searches several of the most popular sites.

Source Helps : about.com


Your Ad Here

Share |

Friday, May 16, 2008

Need a favor from all those using my hacks


Dear readers,

Thanks to design guru Aditya's help, we now have promotion buttons for bvibes. So many of you have picked up my hacks for free in the past and improved your blogs. Here's a small favor that you could do for me in return. As part of my efforts to promote my new venture bvibes.com, I found out that advertising in major blogs like problogger.net costs a lot (in the order of $1000 per month). So, I am asking you to add this small button to your sidebar and help me spread the word.


In Template/Page elements tab, click on "Add a page element" and add a HTML/Javascript element with this piece of code:


<style type="text/css">
.bvibes_img {
margin-left: auto;
margin-right: auto;
float:center;
display:block;
}
</style>
<a href="http://bvibes.com">
<img class="bvibes_img" src="http://bvibes.com/bvibes_button_ad.png">
</a>

Then you can move the button to wherever you want in your sidebar (preferably in a prominent position).

For those who have joined bvibes.com, don't you want to see more people reading your submissions? Here's a bigger button that you could add to your blog.


Just modify the img src line as follows to use this image:
<img class="bvibes_img" src="http://bvibes.com/bvibes_ad.png">

Thank you!

Share |

Special effects for Peekaboo posts!


Yesterday, I thought my most popular hack, Peekaboo posts, needs a makeover. A while back, I received a comment that the post expands too quickly when you click "Read more" link. I thought this could be something to improve upon. How about some special effect like Fade In/Fade Out? You got it! I have integrated the popular javascript effects library script.aculo.us with our peekaboo posts. You can see it in action in my test blog. If you click on "Read more", the full post appears gradually from nowhere and it fades in nicely if you click "Summary only".

You gotta have it in your blog, right? You can have it with very few changes to your template. I spent a few hours on this and surpassed some limitations of script.aculo.us and (bugridden) IE to get this working in Firefox, IE and Opera. Just follow these steps if you have already installed peekaboo posts in your blog.

Step 1: Add these lines before the /head tag.


<script type='text/javascript' src=
'http://anniyalogam.com/scriptaculous/src/prototype.js'/>
<script type='text/javascript' src=
'http://anniyalogam.com/scriptaculous/src/scriptaculous.js?load=effects'/>
<script type='text/javascript'>
var fade = true;
var peekaboo_bgcolor = '#ffffff';
</script>

If your blog's background color is anything other than white, you need to change the peekaboo_bgcolor appropriately for it to work properly in IE. Since most blogs have white background, it should work as it is.

Step 2: Find this portion of code and remove the line shown in red.
   <div class='post-body'>
<b:if cond='data:blog.pageType == "item"'>
<p><data:post.body/></p>
<b:else/>
<style>#fullpost {display:none;}</style>
<p><data:post.body/></p>
That's it! Go ahead and impress your readers. Scriptaculous has many more effects like slide down/up, drap/drop etc which I will try to make use of in the future. If you liked this, help me spread the word about bvibes.com (which has 170+ registered users now) by adding the bvibes button to your sidebar as described here.

Share |

Blogger Template Post Code


<b:if cond='data:blog.pageType != "item"'>
<script type="text/javascript">

var fade = false;
function showFull(id) {
var post = document.getElementById(id);
var spans = post.getElementsByTagName('span');
for (var i = 0; i &lt; spans.length; i++) {
if (spans[i].id == "fullpost") {
if (fade) {
spans[i].style.background = peekaboo_bgcolor;
Effect.Appear(spans[i]);
} else spans[i].style.display = 'inline';
}
if (spans[i].id == "showlink")
spans[i].style.display = 'none';
if (spans[i].id == "hidelink")
spans[i].style.display = 'inline';
}
}


function hideFull(id) {
var post = document.getElementById(id);
var spans = post.getElementsByTagName('span');
for (var i = 0; i &lt; spans.length; i++) {
if (spans[i].id == "fullpost") {
if (fade) {
spans[i].style.background = peekaboo_bgcolor;
Effect.Fade(spans[i]);
} else spans[i].style.display = 'none';
}
if (spans[i].id == "showlink")
spans[i].style.display = 'inline';
if (spans[i].id == "hidelink")
spans[i].style.display = 'none';
}
post.scrollIntoView(true);
}

function checkFull(id) {
var post = document.getElementById(id);
var spans = post.getElementsByTagName('span');
var found = 0;
for (var i = 0; i &lt; spans.length; i++) {
if (spans[i].id == "fullpost") {
spans[i].style.display = 'none';
found = 1;
}
if ((spans[i].id == "showlink") &amp;&amp; (found == 0))
spans[i].style.display = 'none';
}
}

</script>
</b:if>

Share |

Thursday, May 15, 2008

Increase The Number Of Simultaneous Downloads In IE 7


Internet Explorer 7 doesn’t allow you to download more than 2 files at a time. In case if you want to download more than two files at a time then here’s a way:

1. Go to Start and select Run and then type regedit and press Enter.

2. Now you’ll be in the registry editor, navigate to the following key:

HKEY_CURRENT_USER\Software\Microsoft\Windows\CurrentVersion\Internet Settings

3. Right click in the empty space, and create a new DWord (32-bit) value by choosing
New > DWord Value . Name it as follows:

MaxConnectionsPer1_0Server
(Note: The 0 beside Server is a zero)


Your Ad Here

4. Double click this entry and modify the value to 3.
(Substitute 3 for the preferred maximum number of downloads)

5. Create another DWord:

MaxConnectionsPerServer

6. Once again, double click this entry and modify the value to 3.

Now restart your browser. You’ll be able to download more than two files.


Share |

How to embed / play music / audio file within a blog or website


If you have a music file in any format and you wanted to show the option to play it on your blog or you wanted to play the music file on your blog, then this article will explain you how can you do this.

Before showing the steps for playing music file on your blog or website, I would like to warn you that playing background music on your blog may be annoying to many of your visitors and that may reduce your visitor count. I will suggest you not to play background music files on your blog. But yes you can have music player with music files installed on your blog and have visitor the option to play or not to play on the request.

Here are various ways to embed / play music files on your blog or website

  • The first thing you need to do is upload your music file to some public hosting website. You can have your own hosting site or you can use various free hosting sites like googlepages.com , geocities.com, etc
Method 1 Online Playlist
  • After uploading the music / audio file, you need to get its public URL which can be accessed from where in the browser (e.g. http://test.googlepages.com/test.mp3)
  • You can upload any number of such files
  • After this is done create one text file using Notepad or TextPad or any other text editors and copy paste all the URLs of your uploaded music file into it one URL per line as shown bellow.
http://test.googlepages.com/test.mp3

http://test.googlepages.com/test2.mp3
http://test.googlepages.com/test.mp3
  • Now save this text file with .m3u extension (e.g. myplaylist.m3u)
  • Once it is done upload this file also to some hosting website and get its public URL (e.g. http://test.googlepage.com/test.m3u)
  • After all this add HTML /JavaScript gadget to your blog and write code similar to bellow in content part of it
<a href="URL of m3u file">Play some music online</a>
  • If your m3u file's URL is http://test.googlepage.com/test.m3u then above code should look like
<a href="http://test.googlepage.com/test.m3u">Play some music online</a>
  • Save this gadget and you have embed link to online play list of your audio / music file with your blogger blog. In case of website you can copy paste above code in site HTML source of your web page
Method 2 Auto play or Background music

  • You can upload your audio or music file to any web hosting site as mentioned in above method and get its URL
  • Once you get the URL replace your URL in the bellow code in place of Audio File URL in the bellow code
&lt;EMBED src="Audio File URL"

autostart=true
loop=false
volume=100
hidden=true&gt;
&lt;NOEMBED&gt;
&lt;BGSOUND src="Audio File URL"&gt;
&lt;/NOEMBED&gt;

Disabling My Computer


Share |

Not Saving Setting on Exit


Share |

Hiding All Icons from the Desktop


Share |

Allowing Network Access with Blank Passwords


Share |

Avoid fake pop-up or Security Warnings


While browsing the internet you might see some messages like

  • Free update for your computer or Scan your computer with free antivirus etc.

Some pop-ups messages might be helpful for you but you should read first in detail before clicking it. Pop-ups basically an advertiser message or unwanted program and website that might affect your computer performance in a bad way.

If you are using Internet Explorer and want to block the pop-up and unwanted messages, follow the below steps:

  • Open the Internet Explorer.
  • Click on Tools menu.
  • Go to Pop-up Blocker option.

Here you can Turn Off Pop-up Blocker to block pop-up from all websites. But you have option to allow some websites for pop-up. For this purpose open the Pop-up Blocker Setting. Here you can add some specific websites name to allow for pop-up and click Add.

If you feel any problem to block any pop-up message due to some problem, simply click on the X at the right top of the pop-up windows.

Share |

Wednesday, May 07, 2008

Orkut: Collection of hacks to be kool Orkuttian!


Listing in this post some orkut hacks, tricks which you can use to be kool orkuttian!

ALT+0173 Tricks

1. Ever seen someone without First name and/or Last Name! If yes, you might have tried to do the sane but while editing your profile came 2 know that first name n last name can not be left blank! So how did others did that?

While editing name just put ALT+0173 i.e. press ALT & while it is pressed type 0173 in any field u want to left blank! You wont see any output! (In Opera u may see '-' character but surely nothing will be displayed in Firefox n IE)

2. You can also use this special character if you want to escape orkut's default formatting which is applied to your text while posting on communities and writing scrap!

e.g. [r­ed]Hi[/­red] wont look Hi

if u use [r(ALT+0173)ed]Hi[/r(ALT+0173)ed]!

Just insert ALT+0173 anywhere!
U can also insert in Url's to escape image verification while posting links but they wont be clickable :(

3. You can just write ALT+0173 while posting on communities n scrapbook to post blank scrap n posts!

For More ALT+0173 Tricks n demos click here!


Hompage Field...

The best link to setup as your homepage is https://www.orkut.com/GLogin.aspx?cmd=logout
When someone click on this the person will be logged out from his/her orkut session :D

This made many people fool (including me) as we often don't read actual content of homepage field while checking someone's profile!


Do u think logging into Orkut is slow n login box disappears???

Bookmark the following link and use it to login into orkut!

https://www.google.com/............www.orkut.com%2FGLogin.aspx

The above link directly opens orkut login box! So it is faster than normal orkut login!

Share |

Tuesday, May 06, 2008

Remove Yahoo Messenger Banner Ads


Share |

Monday, May 05, 2008

Shoes with a Stair counter


It is a high heel boots comes with an integrated stair counter screwed onto the ankle. Yes, it tells you how many stairs steps you’ve climb in the day, suit for those who are on diet. It will be released sometime in September.

Share |

Some Cool Yahoo Messenger Themes


Bored of the same old Yahoo Messenger theme? So here are some cool yahoo messenger themes for ya. Just try them and have fun.

1. Copper:


http://rapidshare.com/files/29552254/Copper.zip

2. Flames:


http://rapidshare.com/files/29552279/Flames.zip


3. Gold:


http://rapidshare.com/files/29552451/Gold.zip

4. GreenBay Packers:


http://rapidshare.com/files/29552479...BayPackers.zip

5. Vista Gray:


http://rapidshare.com/files/29552572/VISTA_GRAY.zip

6. Another 16 Yahoo Messenger Themes:

* a LiL Bit Girly byNiKY
* black widow
* Blue Jeans
* BlueSky
* Bronze
* Celadon
* Gel LED(green)
* Grayorange
* half_life2
* Indigo
* Maverick
* Metallic Black
* Pink
* ToeBee's_Skins
* XBOX 360
* Hot Rod
* Silver
* Woody
* Y! Vista


http://rapidshare.com/files/50337503...hoo_Themes.rar

*FAQ Installation*

Q1. How to Install Yahoo Messenger Skins?

1. Download the skin.
2. Unzip the file using WinZip or a similiar program.
3. Open your skins folder (My computer\C:\Program Files\Yahoo\Shared\Graphics).
4. Copy and paste all the theme folders there one by one.
5. Once you have all the files in the folder sign into Yahoo Messenger (if you weren't signed in already).
6. Now click on "Login" on your messenger window, then click on "preferences".
7. A new window will open and in that window on the left side click on "appearance".
8. Click on the arrow pointing down next to "current theme" and you'll see the new skin in the list that is in the pull down window (eg. Simpson's). Click on it then click on "apply" which is located at the bottom of that window
9. Click on "Ok" and that's it now your new skin shoud be on your messenger window.

Note: You can also change the color of the writing in your messenger (eg. friends list) so that it matches or so that you can see the names of friends more clearly.

Q2. How To Change The Color Of The Writing?

1. Click on "Login" on your messenger window.
2. Click on "preferences".
3. In the new window that opens click on "appearence".
4. Click on the colored (probably black) square next to "text color" and pick a color you think will look cool. Experiment a little Smile you'll find one that will look great.

Q3. How Do I Open Multiple Accounts In Yahoo Messenger At The Same Time?

1. Open registry editor (Start > Run > type "regedit").
2. Go to "HKEY_CURRENT_USER\Software\Yahoo\Pager\Test"
3. Create a new DWORD Value.
4. Name it "Plural".
5. Edit the DWORD Value to "1".
6. Close the registry editor.

Run Yahoo Messenger as many times as you want

Share |

How To Convert RM To MP3


This tutorial teaches you how to convert .rm files into mp3s. Read on to find out about the software required for this task, where to get it and how to use it.


Software/Tool Required:

Switch Sound File Conversion Software
Switch is a free audio coversion tool. It supports conversion of many format into one another, but what we need to know is that it CAN convert .rm to mp3. There is a Plus version that you can upgrade to for $US19.40 which will unlock some advanced features. You can read more about it at
their website. For the purpose of this tutorial the free version is perfect and there is no need for an upgrade.

NOTE: The free version will have all the advanced features for 14 days from the day you install the software. After that trial period, the advanced features will be deactivated and every once in a while you will be asked to upgrade. Don't worry about that, just click 'NO' or 'Cancel' everytime you are asked to upgrade and you will be fine.


Use the link above to download Switch. Run the downloaded file by double-clicking and simply follow the on-screen instructions to install it on your hard drive.


How to use Switch:

You can use Switch to convert files one at a time, or convert multiple files at once. Here are the steps to convert one/multiple files:

  1. First add files to the queue by clicking either the 'Add File(s)' or 'Add Folder' button (see image below). They both serve the same purpose, with the difference that the first allows you to choose the files you want and the second enables you to add all the contents of a folder to the queue.
  2. Now that you have added your files, you need to choose the Output Folder, the folder where Switch will save the converted files. Click the button labelled as ' ... ' (see image below) and choose your desired folder.

  3. Choose .mp3 (or any format you prefer) as the Output Format from the dropdown menu as shown in the image below.

  4. Finally, click the 'Convert' button at the top right corner to get the job done.
    When you click Convert, a little window (like the one below) will pop up, which shows you what is being done. You can cancel the process by clicking the 'Cancel' button (Dah!). The window will disappear once files are converted.


There are many other commercial softwares that can do this task, but some may not be comfortable with the price tag they come with.

I hope you find this tutorial (my first one ever) useful. If I am being ambiguous with my explanation here, feel free to comment or ask questions below. Now that the issue of file format is hopefully resolved, let's get back to downloading some cool music.

Share |

Friday, May 02, 2008

Yahoo Messenger With Tabs: Mozilla Like Style


Imagine chatting with 5-6 friends at a time and you whole computer screen is filled with chatting windows. It just seems a nightmare. So guys there's a solution to this problem. With this registry tweak you can mod your yahoo messenger so it won't open multiple windows while chatting with many people at the same time.

You will have tabs for different friends like these days we have tabs in browsers. If you don't want tabs at a particular time, you can also turn off this feature with a simple right click on the person's tab and choose open in new window. This little hack will change your chatting experience because you will have a neat screen to look at.

I have made two registry files for the mod. Just download the file and unzip it. It will have two registry file; one named "Tabs" and one "No Tabs". If you want to enable tabs in your messenger just double click on "Tabs" file and click ok when a dialog box appears.


While you can turn off the tab feature in yahoo messenger itself, I have also provided a "No Tabs" registry file so that in case you want this feature to be completely out of your messenger, you can simple double click on this file and choose ok when a dialog box appears.

Size: 24 KB
Download: Mirror 1, Mirror 2

Share |

Some Cool Google Talk Tips And Tricks


With Google Talk being the talk of the town right now, some people loving it, and some hating it, I thought of posting some cool and useful tips and tricks for those who wanna tweak and get some more juice from it. I will try to keep it short and easy.

~Some General Info n Tips~

1. Insert Line Breaks - If you want to have a message that spans multiple paragraphs, just hold shift and hit enter. You can add as many new lines as you want to create.

2. Bold Text - To write something bold, you can use an asterisk before and after the word, like *this*.

3. Italic Text - To use italics, use an underscore before an after the word, like _this_ .

4. Switch Windows - Hitting tab will cycle through open windows. It will select minimized conversations, to expand them just hit enter. If you just want to cycle through IM's and don't care about the buddy list, control-tab will do that and will automatically expand a minimized conversation if you settle on one.

5. Length Of A Single Message - A message can be max 32767 characters long.

~Some More Tips And Tricks~

1. How To Make Conference Calls:
What you need to do to have conference calls: Open up a copy of Google Talk on all computers with which you wish to conference. After one copy is opened make a new shortcut for Google Talk but at the end of the target add /nomutex. If you installed it to the default folder then your shortcut should read "C:\Program Files\Google\Google Talk\googletalk.exe" /nomutex. Open 2nd instance of the software on every user's computer. After this start a chain: User 1 should connect on one instance to user 2. User 2 will connect on his second instance to user 3. User 3 will connect using his second instance back to user 1. With this chain everyone is connected to everyone.

2. Nickname & Status Message:
You can't change your nickname in a way that other people will see it change. Every nickname in the Google Talk contactlist is the part that is before @gmail.com (only the alphabetical characters are used) or the name you chosen for your GMail account. To change the nickname need to go to your Gmail account and change the name there. Choose Settings, Accounts, and then Edit info. Click on the second radio button, and enter your custom name. As a result all of your emails will have that nick as well, there is no way to seperate the two. You can add a website in your custom message, it will be clickable when someone opens a conversation window with you.

3. Contacts:
You don't need to say Yes or No when someone wants to add you as a friend; you can simply ignore it, the request will go away. (On the other hand, someone with whom you chat often will automatically turn to be your friend, unless you disable this).
Wierd: The Gmail account 'user@gmail.com' can't be invited as your friend.

4. Keyboard Shortcuts:
Ctrl + 5 (KeyPad) - Selects all the text typed.
Ctrl + 1 (NumPad) - It goes at the end of the last line.
Ctrl + 7 (NumPad) - It goes at the begin of the last line.
Ctrl + F4 - It closes the current window.
Alt + F4 - It closes the current window.
Alt + Esc - It Minimize the current open window.
Windows + ESC - Open Google Talk (if it's minimized, or in the tray).
F9 - Open Gmail to send an email to the current contact.
F11 - It initiates a telephonic call with your friend.
F12 - It cancels a telephonic call.
Esc - It closes the current window.

Share |

Set Process Priority To Speed Up Specific Processes


Follow this little and cool tip to increase the priority of active processes, this will result in prioritization of processes using the CPU which will speed up specific programs you want.

Follow these steps:

1. Press CTRL-SHIFT-ESC

2. It will open Windows Task Manager showing current running processes.


3. Now right click on any one of the active processes (whichever you want to speed up), the last option will be of setting the priority. It will have the following options:

  • Realtime
  • High
  • AboveNormal
  • Normal
  • BelowNormal
  • Low
The default option is Normal. Now for example, if you are burning a CD/DVD so set the priority of your CD/DVD writing program high, and guess what, less chances of crashed CD’s.

You can also set the priority of some programs low so that they don't consume much of your system's resources. Like for example, if you are downloading something using uTorrent, then you can set its priority low, so that there's ample resources left for other programs to work smoothly.

So just keep trying it with different programs and you will notice the difference.
Hope you liked this trick. Send in your comments to support me

Share |

Blogger now schedules future-dated posts


Now Blogger has released new feature for the all bloggers . You can schedule your post when you want to publish it and currently save it as a draft. For this you need to use draft.blogger.com instead of www.blogger.com
Scheduled post publishing, which we talked about testing on Blogger in draft last month, is now live for everyone. If you set a post’s date into the future, Blogger will wait to publish until that time comes.

Have you ever wanted to announce something on a certain date but knew you wouldn’t be at a computer to make a post? Or you wanted to keep posting regularly but knew you’d be on vacation for a few weeks? Scheduled post publishing is here to help you out.

Scheduling a post is easy to do: on the post editor page, click the “Post Options” toggle to show the “Post date and time” fields. Then, type a post date and time that’s in the future. When you click the “Publish” button, your post will become “scheduled.” When the date and time of the post arrive, it will be automatically published to your blog.


“Scheduled” posts appear in your Edit Posts list alongside your drafts and published posts. To un-schedule a post, simply save it as a draft any time before it gets published.

One quick note: If you want to give a post a date in the future but have it appear on your blog now, you’ll need to add in an extra step. First, publish your post with the current date and time. This will make it appear on your blog. Then, edit the post to change the date into the future and publish it again.

We don’t re-schedule posts that are already published, so the post will stay on your blog but sort to the very top. The same is true of future dated posts you’ve already made, so there’s no need to worry about your existing posts disappearing, or having your blog assaulted by unplanned entries in, say, 2027.

P.S.: Thanks to everyone who tested this out on Blogger in draft and posted comments! We appreciate your time and effort.

Share |

Topics

 
Embed Wave to Blogger